Thursday, June 16, 2016

Gawar Aloo Subzi, Cluster Beans ( Kothavarangai ) Potato Curry


          We use cluster beans/kothavarangai/gawar a lot in South Indian Cooking, we make poriyal, paruppu usili, in avials, dry them and use as vadams, but I have never really tried to do a side dish with it for rotis until recently. I have tasted it in subzis at a Gujarati friend's place and even in restaurants but when I tried it at home, I was not completely satisfied. Then I saw this recipe, it has both gawar/cluster beans and potato in it, the ajwain, peanut powder and coconut and other spices make it so flavorful and it goes very well with chappathis/rotis..

Need To Have

  • Diced Potato - 1 cup
  • Cluster Beans/Gawar - 11/2 cups, 1 and 1/2 " long pieces
  • Onion - 1 medium, chopped
  • Garlic Cloves - 4, chopped
  • Green Chilly - 1, chopped finely
  • Ajwain Seeds - 1/2 teaspoon
  • Turmeric Powder - 1/4 teaspoon
  • Raw Peanuts - 2 tablespoons
  • Coriander Powder - 1 teaspoon
  • Grated Coconut - 2 tablespoons
  • Salt to taste

Original Recipe here

Method


          Wash and chop the cluster beans into 1 and 1/2" pieces and keep. Heat some oil, add the ajwain seeds, when it starts sizzling, add the garlic and onion and saute till it turns translucent.


          Add the potatoes and mix for a minute. Then add the cluster beans, turmeric powder and salt, mix then add about 1/4 cup water, cover and cook on medium-low heat till the vegetables are cooked.


          In the meantime, roast the peanuts, cool, peel, coarsely pound and keep.


          Once the vegetables are cooked and there is no water, add the peanut powder, coconut and the coriander powder, mix and keep cooking for another 3 to 4 minutes, then remove and serve.


Note
Before adding the peanut powder, make sure that the vegetables are cooked and there is no water, if there is water, open the lid and cook till the mixture becomes semi-dry.
If you need more spice, add another green chilly.
The ajwain gives a unique flavor to the dish, if you don't like it then use cumin seeds.

Next Up: Something with Potatoes


Wednesday, June 15, 2016

No Bake Almond Butter Tart with Speculoos Cookie Crust


http://schneiderchen.de | © 2016 | http://angiesrecipes.blogspot.com


This features a creamy, rich roasted almond butter-ricotta cheese filling in a no bake speculoos cookie crust. I have used homemade roasted almond butter rather than the peanut butter used in the original recipe, but any other nut butter will also work. Also, the recipe called for chocolate ganache as the topping, but I just simply garnished the tarts with a few drizzles of melted white chocolate and some chopped pistachio nuts.


CrustFillingTopping

  • 220 g Speculoos cookies
  • 60 g Butter, melted

  • 200 g Ricotta cheese
  • 180 g Homemade roasted almond butter
  • 1/3 tsp Vanilla powder
  • 2 tbsp Coconut oil, softened
  • 10 drop Vanilla-flavoured liquid stevia

  • White chocolate, chopped
  • Pistachio nuts, chopped

  1. Finely crush cookies in a food processor or blender. Melt butter. In a bowl stir the melted butter and crushed cookies together. Firmly press down cookie mixture into two 12-cm tart pans or one 24-cm pan. Place in the refrigerator while making the filling.
  2. In a large bowl, beat the ricotta cheese, almond butter, vanilla powder, coconut oil and liquid stevia together until fluffy with an electric mixer.
  3. Scrape the mixture into the tart shells and smooth the surface with a spatula. Return to the refrigerator for 2 hours or overnight.
  4. Melt the white chocolate in a microwave and drizzle over the tarts. Garnish with pistachio nuts.


http://schneiderchen.de | © 2016 | http://angiesrecipes.blogspot.com


http://schneiderchen.de | © 2016 | http://angiesrecipes.blogspot.com


Tuesday, June 14, 2016

Vazhaipoo Pakoda, Banana Flower Fritters


          Whenever we drive from Bangalore to Chennai, we usually make a break in between at a restaurant, and we usually have some snack and coffee there. The one snack that we have had on all the times we stopped there, is this Vazhaipoo Pakoda, my daughter just loves it. The pakoda is so crispy and the vazhaipoo/banana flower/kele ke phool gives a nice taste to the pakodas. Usually in other restaurants, you'll find vazhaipoo vadai and cutlets but this pakora, I have not tasted anywhere else. I wanted to make it at home, I didn't have any recipe, so I just made it according to the taste that I remembered, asked my daughter to taste and waited for her verdict. She gave me a thumbs up, the pakoras tasted very good and I should say 99% close to the taste of the pakoras from the restaurant. Do try this the next time you buy banana flower, I am sure you'll love it..

Need To Have

  • Vazhaipoo - 21/2 cups
  • Chana Dal/Bengal Gram - 1/2 cup
  • Dried Red Chillies - 4
  • Garlic Cloves - 2 big
  • Fennel Seeds - 2 teaspoons
  • Rice Flour - 1 tablespoon
  • Turmeric Powder - 1/4 teaspoon
  • Curry Leaves - a big handful
  • Salt to taste

Method


          Wash and soak the chana dal for about 2 hours. Then grind it with red chillies, fennel seeds and garlic into a coarse paste without adding any water.


          Add it to the cleaned, washed and roughly chopped ( lengthwise ) vazhaipoo along with the rice flour, salt, curry leaves and turmeric powder and mix it well.


          Heat some oil for deep frying, take a handful of the mixture and drop it in the oil, spreading it out as you drop. Fry till golden, remove, drain the excess oil and serve it hot.


Note
Cleaning vazhaipoo takes some time, we have to remove the outer big brown petals, you'll see a bunch ( these only mature into bananas ), between each of the brown petals. We have to clean these small ones, remove the center thick stem and the onion like thing. This may sound a little complicated, I'll soon update about this with pictures.
Don't chop the banana flower into small pieces, just chop it coarsely, lengthwise.

Monday, June 13, 2016

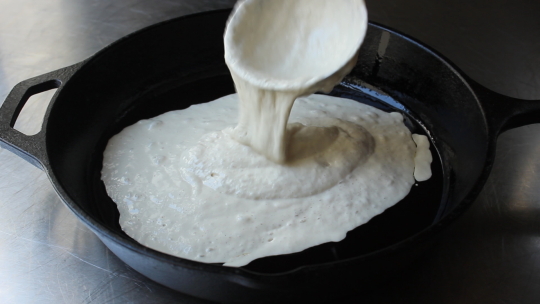
Pourable Pizza – The Great Liquid Dough Experiment

I once made a mini-pizza using a crumpet. No, I’m not starting a limerick.  Anyway, I toasted it nice and crisp, topped it with sauce and cheese, and it really was not bad. So I thought, what if this was much thinner, and made from the same ingredients as pizza dough? After a few tests, this pourable pizza was born.

Besides being kind of fun to make, this method features a few nice perks. There’s no kneading required, nor do you have to roll/stretch/spin your dough into shape. While thick crust pizza is relative easy to form at home, few can pull off stretching the dough really thin, so this is a very easy way to achieve that.

Also, the great challenge with homemade pizza is the under-cooked crust bottom, and this method allows for that crispy, near-charred bottom you usually only get from a pizza oven. Once topped, I like to finish under the broiler, but a 500 F. oven will also do the job nicely.

Please note, I’m not trying to replace the classic method with this drippy dough, but rather offer a possibly easier-in-some-ways alternative for your next pizza night. And yes, this does work for making thicker crusts. I hope you give this a try soon. Enjoy!


Ingredients for 4 eight-inch pizzas:
3 cups (14 ounces by weight) *flour
2 cups warm water (105-110 F)
1 package dry active yeast (2 1/4 teaspoons)
1 teaspoon kosher salt
1 1/2 teaspoons honey
1 tablespoon olive oil 

Note: Like I said in the video, use a whisk attachment, not a dough hook! You can also simply whisk this by hand for 5 minutes. 

* I used something called double-zero flour or “00” flour, which is an Italian flour used for pasta and pizza making. It is very finely milled, and lovely to work with. If you can’t get or find, just use all-purpose.

Next Up: A Pizza You Can Pour


100% Whole Wheat Bread, Atta Bread ( No Maida )

         
          It's been months since I bought bread, I have been baking my own 100% Whole Wheat Bread or Atta Bread. I tried this and that and finally settled down with this recipe, even then, I had some flops and then found my mistakes and corrected them. I have given a list of errors that we have a chance to make and end up with a dense and flat bread in the 'Note' section, do read it before baking. Since I have used Atta for baking the bread and no added gluten, the bread might be a little crumbly when compared to White Bread, but otherwise it came out soft and had the porous texture..

Need To Have

  • Whole Wheat Flour/Atta - 3 cups
  • Instant Yeast - 1 teaspoon
  • Sugar - 3 teaspoons
  • Salt - 1 teaspoon
  • Oil - 2 tablespoons plus some for greasing the pan 
  • Curd/Yogurt - 2 tablespoons
  • Hottish Water - 1 cup + 2 tablespoons

Method


          Add the yeast and a teaspoon of sugar to a bowl, add 1/2 cup of hottish water. Wait till the yeast bubbles up, then add the remaining 2 teaspoons of sugar and the remaining 1/2 cup and 2 tablespoons of water and 1 cup of the flour. Whisk it to a smooth mixture, cover and leave it in a warm place for an hour.


          After and hour, you'll see the mixture has frothed up. Now add the salt, 2 tablespoons of oil, curd and the remaining 2 cups of flour. Bring everything together to form a sticky dough, then knead the dough well for about 10 minutes. The dough should be manageable now but at the same time soft and not totally without moisture. Apply some oil and make a ball with the dough.


          Roll out the dough into a rectangle, fold a little on both sides like shown in the picture. Then fold it one more time and pinch the edges. Place it in a greased loaf pan and flatten it gently with your hand.


          Cover and leave it for an hour till the dough has risen a little above the edges of the pan ( about an inch and no more, measuring at the center of the loaf ). Now the loaf is ready to be baked, bake it in a preheated oven at 200 C for 30 minutes. Remove, let it cool in the pan for 10 minutes, then remove it from the pan and cool it completely on a wire rack and then slice it.


Note
When making the dough, if after kneading for 2 to 3 minutes, the dough is still very sticky, then add some more flour but don't add too much. Usually, if you measure your flour properly, you'll not need it.
The dough shouldn't be dry like we do for rotis, it should still be soft but not sticky and not a wobbly dough.
If after applying a little oil on the dough after kneading, if the dough is not sticky but very soft and wobbly, then the dough will rise and fall flat once you put it in the oven for baking.
If the dough is very stiff and dry, then the bread will be very crumbly.
I have used a 81/2" x 41/2" pan, if you are using a bigger pan, then increase the amount of flour accordingly.
The timing given for the dough to rise is just a guideline, it might rise faster or slower depending on the temperature of the surroundings.
Likewise, the water quantity that I have given will be correct, but sometimes depending on the humidity, it might be a little more or less.
When I say hottish water, I mean the water should be slightly hotter than warm.
Always wait for your yeast to bubble up, that way you'll know whether the yeast is working or not.
If you fail the first time, don't give up, just find out your mistake and fix it, you'll get the hang of it after a couple of times.

Thursday, June 9, 2016

Chickpea Olive Salad with Za'atar and Cherry Tomatoes

Chickpea Olive Salad with Za'atar and Cherry Tomatoes

With temperatures soaring at the end of May, a simple salad was just what I wanted for dinner. Of course, simple is very often the tastiest, especially when it's simple that you want and you're using great ingredients. I've been enjoying finding ways to use za'atar lately — a highly aromatic and uniquely delicious Middle Eastern blend of dried herbs, sesame seeds and salt, za'atar goes wonderfully well with tangy foods like tomatoes as well as with bread. So substitute bread for buttery soft chickpeas, toss in the cherry tomatoes and some olives for good measure and za'atar. There you have an easy and simply wonderful summer salad.

Pre-blended za'atar is much more commonly found in supermarkets now than before, as well as in Middle Eastern grocers, but it's also very easy to make at home using the fresh dried herbs you have on hand.


Chickpea Olive Salad with Za'atar and Cherry TomatoesChickpea Olive Salad with Za'atar and Cherry Tomatoes
Recipe by
Cuisine: Middle Eastern
Published on June 9, 2016

Simple but delicious summer salad of buttery soft chickpeas, tangy cherry tomatoes and plump olives dressed in olive oil, lemon juice and za'atar

Print this recipePrint this recipe

Ingredients:
  • 1 cup dried chickpeas (3 cups cooked or 2 14 oz cans)
  • 1/2 cup pitted Kalamata olives, sliced or chopped
  • 3 tablespoons olive oil, or more as needed
  • 4 tablespoons za'atar
  • small handful of fresh parsley, chopped
  • 1 cup cherry tomatoes, halved
  • juice from 1 lemon (3 tablespoons)
  • 1 teaspoon sea salt, or to taste
  • fresh cracked black pepper, to taste
Instructions:
  • Rinse the chickpeas and soak in several inches of water for 8 hours or overnight. Drain and rinse, then transfer to a medium saucepan and cover with fresh water. Bring to a boil, reduce heat to medium-low, cover, and simmer for 1 to 1 1/2 hours or until soft. Drain and transfer to a large bowl.

  • Add the remaining ingredients to the chickpeas and toss until well combined.

  • Serve chilled or at room temperature.

Makes 4 to 6 servings

chickpea tomato salad

This is my contribution to My Legume Love Affair, a monthly event celebrating the goodness of legumes. This popular event was started my Susan of The Well Seasoned Cook and now is administered by me. I am hosting this month. I'm also sharing with No Croutons Required, another popular event focusing on vegetarian soups and salad. Alternately hosted by my myself and Jacqueline of Tinned Tomatoes, Jac is hosting this month.

Other chickpea salads to enjoy from Lisa's Kitchen:
Chickpea Salad with Vegan Mayonnaise
Chickpea Salad with Chat Masala, Mango and Pomegranate Seeds
Summer Chickpea Salad
Chickpea Salad with Tamarind Dressing

Audio: Thomas Tallis

Wednesday, June 8, 2016

Buttermilk Spelt Emmer Dinner Rolls


http://schneiderchen.de | © 2016 | http://angiesrecipes.blogspot.com


http://schneiderchen.de | © 2016 | http://angiesrecipes.blogspot.com


I like to play around with rich, sweet and nutty ancient grains when baking bread, but you can use modern wheat flour instead. Emmer is also called Farro and quite similar in flavour of Einkorn. This recipe makes 6-8 rolls depending on the size you want. You could also bake this in a loaf pan for a tasty sandwich bread.


  • 190 g Buttermilk, well shaken and room-temperature
  • 150 g Rye sourdough starter, 100% hydration
  • 2 tbsp Olive oil
  • 1/2 tsp Sea salt
  • 200 g Organic spelt bread flour
  • 100 g organic emmer berries, ground into flour
  • 2 tsp Coconut sugar
  • 5 g Active dry yeast


  1. Measure all the ingredients and place, in the order listed, into your bread pan. Select the dough setting. Start the machine.
  2. Once dough setting is complete, remove dough from bread machine and place on a lightly floured surface. Divide the dough into 6 or 8 pieces. Shape each into a ball and place them on a baking sheet lined with parchment paper. Cover with a clean kitchen towel and set aside for 45 minutes until doubled in size.
  3. Pour a cup of water into the roasting tray at the bottom of the oven and preheat it to 210C/420F and pour. Bake the bread for 25 to 30 minutes or until golden brown.


http://schneiderchen.de | © 2016 | http://angiesrecipes.blogspot.com


http://schneiderchen.de | © 2016 | http://angiesrecipes.blogspot.com


Wednesday, June 1, 2016

Paprika Chicken with Quinoa Tabbouleh


http://schneiderchen.de | © 2016 | http://angiesrecipes.blogspot.com


http://schneiderchen.de | © 2016 | http://angiesrecipes.blogspot.com


With tender paprika chicken breast, an excellent source of lean protein, and quinoa, a gluten-free wholegrain also rich in protein, dietary fibre and antioxidants, this is a satisfying and super healthy dish that is filled with wonderful flavours and textures.


Paprika Chicken with Quinoa Tabbouleh

adapted from taste


  • 150 g Regular white quinoa, well rinsed
  • 300 ml Water
  • 2 tbsp Parsley leaves finely chopped
  • 1 tbsp Olive herb leaves
  • 3 tbsp Mint leaves, finely chopped
  • 2 Tomatoes, diced
  • 3 stalk Spring onions, thinly sliced

  • 50 ml Extra virgin olive oil
  • 2 tbsp Lemon juice
  • 1 tsp Paprika powder, plus extra to sprinkle
  • 1 tsp Ground cumin
  • Pinch of cayenne
  • 1 tsp Caster sugar
  • 100 g Low-fat thick Greek yoghurt
  • 1/2 tbsp Olive oil
  • 2 x 180 g Chicken breast fillets
  • Sea salt, to season

  1. Combine 300 ml water and rinsed quinoa in a saucepan over medium-high heat. Bring to the boil. Reduce heat to low. Cover and simmer for 12-15 minutes or until the liquid is absorbed. Transfer to a large bowl. Set aside to cool.
  2. Add herbs, tomato, and spring onion to quinoa and toss to combine. Combine olive oil, lemon juice, 1/2 teaspoon paprika, cumin, cayenne and sugar, then season with salt.
  3. Place yoghurt in a bowl and drizzle over 2 teaspoons dressing, then sprinkle with some paprika. Toss the salad in remaining dressing.
  4. Mix 1/2 tablespoon olive oil and remaining 1/2 teaspoon of paprika, season, then brush over chicken. Heat a large grill pan until hot. Add in chicken and cook for 7-8 minutes each side until cooked through. Serve sliced with salad and yoghurt.


http://schneiderchen.de | © 2016 | http://angiesrecipes.blogspot.com


http://schneiderchen.de | © 2016 | http://angiesrecipes.blogspot.com


My Legume Love Affair #96 - June Edition 2016


I'm excited to host My Legume Love Affair this month. As many of my readers will know, this is a long running event focusing on the goodness of legumes, started by lovely Susan of The Well Seasoned Cook and now administered by me of Lisa's Kitchen. Each month we have a different host but it's my turn now for the month of June. We are at edition #96 this month. I look forward to more legume recipes as legumes are an important and plentiful source of protein, especially if you are a vegetarian or vegan.

It is easy to participate. All you need to do is prepare a legume-centric dish. Link back to this announcement, my blog and also Susan's blog, as she is the original founder of the event. Share your creation using the linky tool at the end of this post by the end of the month. Use of the lovely logo, designed by Susan, is optional, but appreciated.

Only one entry per blogger please and it must be vegetarian. Recipes from archives will only be accepted if reposted and updated with the links required.

For your dish to be included in the roundup, it must contain more than just a few tablespoons of legumes. The slight exception to this are legumes such as fenugreek or tamarind that typically are used in smaller quantities. Fresh or dried beans, lentils, pulses, and the sometimes edible pods that contain these seeds, and derivative products such as tofu or besan, along with fenugreek, carob, and peanuts are all acceptable. The possibilities are endless. Please just ensure that your shining ingredient is in fact a member of the legume family. All types of cuisines and courses are welcome, meaning appetizers, sides, mains and desserts are all acceptable so long as the mighty legume is the key ingredient.

Thanks in advance for your participation and inspiration. I am looking for guest hosts for 2016. Send me an email at legume.lisa AT gmail DOT com or leave a comment on this post if you would like to host. I still have a few spots left for this year.