Tuesday, June 21, 2016

Watermelon Kuzhi Paniyarams


          After the Watermelon dosa became a hit at home, I wanted to try other dishes with the fruit. I tried a couple of them and this Watermelon Kuzhi Paniyarams was the first on the list. I have used the white rind part of the watermelon and to make it more healthy, I made the paniyarams using millets, I have used varagu/proso millet and the paniyarams turned out very fluffy and soft. The batter needs to be fermented overnight or at least for 10 to 12 hours and the same batter can be used for making both sweet and kara/spicy paniyarams. The sweet ones can be had as such and the spicy ones can be served with some coconut or peanut based chutney and they make a delicious breakfast, snack or even dinner..

Need To Have

  • Varagu/Proso Millet - 1/2 cup
  • Urad Dal/Husked Black Gram - 2 teaspoons
  • Fenugreek Seeds/Methi - 1/2 teaspoon
  • Chopped Watermelon Rind - 2 cups + 2 tablespoons
  • Aval/Rice Flakes/Poha - 2 tablespoons
  • Salt - 1/2 teaspoon

For The Kara/Spicy Paniyarams

  • Mustard Seeds - 1/2 teaspoon
  • Urad Dal/Husked Black Gram - 2 teaspoons
  • Asafoetida - 1/4 teaspoon
  • Onion - 1 medium, chopped
  • Green Chilly - 1, chopped
  • Curry Leaves - 10

For Sweet Paniyarams

  • Jaggery Powder - 2 tablespoons
  • Cardamom - 1

Method


          Wash and soak the proso millet, urad dal and methi seeds together for about 3 hours. The rice flakes/poha need to be soaked for just 5 minutes and chop the watermelon rind.


          First grind the watermelon pieces, then add the drained millet mixture along with the poha and grind everything into a smooth mixture and remove.


           Add the salt, mix it well and leave it overnight to ferment. Now I reserved just 1/4 cup of the batter to try out the sweet paniyarams and used the rest of the batter to make the spicy ones.


          First let's make the spicy ones, heat some oil, add the urad dal and mustard seeds, once the seeds start sputtering, add the asafoetida followed by the onion, green chilly and curry leaves and saute till the onions turn translucent. Add this to the batter and mix it.


           Heat the paniyaram pan, drizzle a little oil into each of the moulds, spoon the batter to about 3/4 th the height of the mould. Cover and cook on medium-low heat till the top is set and cooked, flip it and cook on the other side and remove.


           Now coming to the sweet paniyarams, to the 1/4 cup of the batter, add the jaggery and the cardamom ( powder the inner pods of the cardamom ), mix and make the paniyarams.


Note
You can use idli rice instead of the millets.
Drain and add the millets and the poha, the water from the watermelon is enough for grinding.

Monday, June 20, 2016

“Gazpacho Verde” with Burrata Cheese – Swampy, in a Good Way

I’m not crazy about the name for this recipe, but I honestly didn’t know what else to call it, and I blame Twitter for that. Allow me to explain. I saw a photo on there of what I thought was a burrata sitting in a pool of green gazpacho soup, but after a closer look, it turned out to be salsa verde.

That does sound pretty good, but due to the mistaken identity, I was now fixated on the idea of serving this fresh, extra-creamy mozzarella in a bowl of ice cold, cucumber and herb-based gazpacho.

Except, I wanted the cheese to be the star of the dish, with the soup acting almost as a sauce. I thought of calling it something like, “Burrata in a Swamp,” but that didn’t pass the wife test, so long story short, I went with the search engine friendly name you see at the top of the post.

I really wanted a thin, light texture to play off the gooey cheese, so I didn’t add any bread, and also strained it through a fine sieve. The gazpacho seems colder, and more intense this way, and in my opinion works better than a thicker version would. So, whether you’re going to do this with the cheese or not, I really hope you give it a try soon. Enjoy!


Ingredient for 4 portions “Gazpacho Verde” with Burrata:
8 ounces burrata cheese (1/4 cup per serving)
3 cups sliced English cucumber (about one large)
2 cloves garlic, sliced
2 tablespoons picked fresh oregano leaves
1 cup packed picked basil leaves
1/4 to 1/3 cup seasoned *rice vinegar, to taste
1/4 cup olive oil
pinch cayenne pepper
salt and freshly ground black pepper to taste
1/2 cup water, plus more as needed

*If using regular rice vinegar, season to taste with salt and sugar. You can also use white wine or sherry vinegar, and do the same.

Next Up: Something Fresh and Green, but Also White


Peanut Coriander Chutney, Verkadalai Kothamalli Chutney


          The other chutney that I make more often, other than the tomato or coconut chutney, for idlis and dosas is the peanut chutney. I have already posted one Peanut Chutney and another Tomato Peanut Chutney in the blog, and today's chutney is a slight variation to that. I have added some sauteed coriander leaves and green chillies to the peanuts and this gives a nice color and a different flavor to the chutney. This chutney would go well with all types of idlis, dosas, adais and paniyarams..

Need To Have

  • Raw Peanuts - 1/2 cup
  • Chopped Coriander - 1 cup, packed
  • Green Chillies - 2
  • Tamarind - 2 blueberry size balls
  • Asafoetida - 1/4 teaspoon
  • Salt to taste

Method


          Dry roast the peanuts, cool, peel the skin and keep. Heat a little oil, add the green chillies followed by the coriander leaves and saute till they wilt.


         Now grind together the peanuts, coriander-green chillies, tamarind, asafoetida and salt. Remove and serve.


Note
You can add a piece of ginger to the chutney.
Don't grind it too smoothly, the chutney should have fine semolina texture.
Add more or less green chillies according to your taste.

Sunday, June 19, 2016

Bisi Bele Bhath (Rice with Lentils and Spices)

Bisi Bele Bath (Rice with Lentils and Spices)

This combination of rice, toor dal, vegetables and spices is essentially a south Indian variation of north Indian kitcheree — the classic one-pot meal — with the use of tamarind, coconut, aromatic spices and a tempering characteristic of south Indian cooking. The bisi bele spice mix is a rather unique and wonderfully aromatic blend of coriander, fenugreek, dried chiles and cinnamon that is a snap to make up. A fragrant and warming dish with a bit of heat and a delightful sweet and sour flavor, bisi bele bhath is all you need for a satisfying and nourishing meal. Throw in some crunchy vegetables and roasted cashews for a nutty taste, bisi bele bhath is a south Indian comfort food and gentle for tender tummies.

There are a few steps to this recipe but it's totally worth the effort as you get a complete meal for your effort. The bisi bele masala or spice blend is available commercially at Indian grocers, but grinding your own blend at home always give you the freshest spice blend experience. I've used carots and green beans for the vegetables in this version, but feel free to experiment with other vegetables such as okra.

Bisi Bele Bhath (Rice with Lentils and Spices)Bisi Bele Bhath (Rice with Lentils and Spices)
Recipe by
Cuisine: South Indian
Published on June 19, 2016

A fragrant and warming south Indian one-pot meal of rice, lentils, vegetables, tamarind and aromatic spices tossed with coconut and cashews

Print this recipePrint this recipe

Bisi bele masala (spice blend):
  • 1/2 tablespoon coriander seeds
  • 1/2 teaspoon fenugreek (methi) seeds
  • 4 whole cloves
  • 1 cinnamon stick, broken into bits
  • 1 to 2 dried red chilies, broken into bits
  • 2 teaspoon dried split urad dal or channa dal
Rice and lentils:
  • 1 cup white basmati or jasmine rice
  • 1/2 cup toor dal (split pigeon peas)
  • 1 tablespoon tamarind pulp, soaked in 2/3 cup hot water for 20 to 30 minutes
  • 1 tablespoon coconut oil
  • 1 small red onion
  • 2 green or red chilies, seeded and minced
  • 2 medium carrots, chopped
  • 1/2 cup green beans, chopped
  • 1/2 tablespoon coconut or brown sugar or jaggery
  • 1/2 cup roasted unsalted cashews, halved or chopped
  • 1/2 cup toasted dried unsweetened shredded coconut
  • 1 to 2 teaspoons sea salt, or to taste
Tempering:
  • 2 teaspoons coconut oil
  • 1 teaspoon brown mustard seeds
  • 1 teaspoon cumin seeds
  • a few pinches of asafetida
  • small handful of dried curry leaves, crumbled
Instructions:
  • Rinse the rice under cold running water and transfer to a medium saucepan. Cover with 2 cups water and bring to a boil. Reduce heat to low, cover, and cook for 15 minutes until the water is absorbed. Remove from heat and set aside.

  • Meanwhile, rinse the toor dal and bring to a boil in a large saucpean with 2 cups water. Reduce heat to a simmer and cook until the dal is tender, about 40 to 50 minutes.

  • While the rice and dal are cooking, toast the ingredients for the bisi bele masala (spice blend) for a few minutes in a small unoiled saucepan over medium heat, tossing or stirring frequently. Transfer to a coffee to spice grinder and blend to a powder. Set aside.

  • Now drain the soaked tamarind pulp by pushing it through a sieve over a bowl and remove any seeds that may remain in the pulp. Reserve the soaking water.

  • Heat the coconut oil in a frying pan over medium heat. When hot, add the onion and sauté for 5 minutes until softened. Now add the chilies, carrots and green beans. Continue to fry until the vegetables are just tender.

  • Once the toor dal has cooked, add the tamarind and its soaking water, sugar or jaggery, spice blend and salt. Mix well. Add the cooked vegetables, rice, coconut and cashews. Add a bit more water if it seems too dry. Stir gently to combine.

  • For the tempering, heat the oil in a small saucepan over medium-high heat. When hot, add the mustard seeds and cumin seeds. Once the mustard seeds begin to splutter and pop — 30 to 60 seconds — add the asafetida and curry leaves. Stir once and then pour into the rice and lentil mixture. Cover and let sit for 5 to 10 minutes, then stir and serve hot.

Makes 4 to 6 servings

Bisi Bele Bath

Serves 4 - 6.

I'm sharing this with Jac's Weekly Meat Free Mondays event.

Other rice dishes to enjoy:
Coconut Rice with Fragrant Seeds and Spices
Indian Lemon Brown Rice
Indian Lentil and Rice Pancakes
Indian Yellow Rice

Thursday, June 16, 2016

Potato Roses – A Side Dish That's Stacked

I saw a picture of something called “potato stacks,” online last year, on a blog called Home Cooking Adventure, and I thought to myself, those sure look a lot more like roses than stacks. So, long story short, I stole the idea, and now that it has a much more social media-friendly name, I fully expect this to go viral.

The technique is straightforward, but make sure you season the potatoes generously. I use about two teaspoons of kosher salt in this, and along with the cheese, that seems to be just about right. Having said that, taste for salt varies greatly from person to person, so remember what you used, and adjust next time if need be. These would be great for entertaining, since you can make them ahead, and keep them warm in the pan, or cool and reheat in the oven when you are ready to serve. I really hope you give these a try soon. Enjoy!


Makes 12 Potato Roses:
3 pounds Yukon Gold potatoes
2 teaspoons kosher salt
1/3 to 1/2 cup melted butter (1 stick)
1 tablespoon minced rosemary or 2 tablespoon thyme leaves
freshly ground black pepper and cayenne to taste
3/4 cup finely grated Parmigiano-Reggiano

- 400 F. for 45-60 minutes

Gawar Aloo Subzi, Cluster Beans ( Kothavarangai ) Potato Curry


          We use cluster beans/kothavarangai/gawar a lot in South Indian Cooking, we make poriyal, paruppu usili, in avials, dry them and use as vadams, but I have never really tried to do a side dish with it for rotis until recently. I have tasted it in subzis at a Gujarati friend's place and even in restaurants but when I tried it at home, I was not completely satisfied. Then I saw this recipe, it has both gawar/cluster beans and potato in it, the ajwain, peanut powder and coconut and other spices make it so flavorful and it goes very well with chappathis/rotis..

Need To Have

  • Diced Potato - 1 cup
  • Cluster Beans/Gawar - 11/2 cups, 1 and 1/2 " long pieces
  • Onion - 1 medium, chopped
  • Garlic Cloves - 4, chopped
  • Green Chilly - 1, chopped finely
  • Ajwain Seeds - 1/2 teaspoon
  • Turmeric Powder - 1/4 teaspoon
  • Raw Peanuts - 2 tablespoons
  • Coriander Powder - 1 teaspoon
  • Grated Coconut - 2 tablespoons
  • Salt to taste

Original Recipe here

Method


          Wash and chop the cluster beans into 1 and 1/2" pieces and keep. Heat some oil, add the ajwain seeds, when it starts sizzling, add the garlic and onion and saute till it turns translucent.


          Add the potatoes and mix for a minute. Then add the cluster beans, turmeric powder and salt, mix then add about 1/4 cup water, cover and cook on medium-low heat till the vegetables are cooked.


          In the meantime, roast the peanuts, cool, peel, coarsely pound and keep.


          Once the vegetables are cooked and there is no water, add the peanut powder, coconut and the coriander powder, mix and keep cooking for another 3 to 4 minutes, then remove and serve.


Note
Before adding the peanut powder, make sure that the vegetables are cooked and there is no water, if there is water, open the lid and cook till the mixture becomes semi-dry.
If you need more spice, add another green chilly.
The ajwain gives a unique flavor to the dish, if you don't like it then use cumin seeds.

Next Up: Something with Potatoes


Wednesday, June 15, 2016

No Bake Almond Butter Tart with Speculoos Cookie Crust


http://schneiderchen.de | © 2016 | http://angiesrecipes.blogspot.com


This features a creamy, rich roasted almond butter-ricotta cheese filling in a no bake speculoos cookie crust. I have used homemade roasted almond butter rather than the peanut butter used in the original recipe, but any other nut butter will also work. Also, the recipe called for chocolate ganache as the topping, but I just simply garnished the tarts with a few drizzles of melted white chocolate and some chopped pistachio nuts.


CrustFillingTopping

  • 220 g Speculoos cookies
  • 60 g Butter, melted

  • 200 g Ricotta cheese
  • 180 g Homemade roasted almond butter
  • 1/3 tsp Vanilla powder
  • 2 tbsp Coconut oil, softened
  • 10 drop Vanilla-flavoured liquid stevia

  • White chocolate, chopped
  • Pistachio nuts, chopped

  1. Finely crush cookies in a food processor or blender. Melt butter. In a bowl stir the melted butter and crushed cookies together. Firmly press down cookie mixture into two 12-cm tart pans or one 24-cm pan. Place in the refrigerator while making the filling.
  2. In a large bowl, beat the ricotta cheese, almond butter, vanilla powder, coconut oil and liquid stevia together until fluffy with an electric mixer.
  3. Scrape the mixture into the tart shells and smooth the surface with a spatula. Return to the refrigerator for 2 hours or overnight.
  4. Melt the white chocolate in a microwave and drizzle over the tarts. Garnish with pistachio nuts.


http://schneiderchen.de | © 2016 | http://angiesrecipes.blogspot.com


http://schneiderchen.de | © 2016 | http://angiesrecipes.blogspot.com


Tuesday, June 14, 2016

Vazhaipoo Pakoda, Banana Flower Fritters


          Whenever we drive from Bangalore to Chennai, we usually make a break in between at a restaurant, and we usually have some snack and coffee there. The one snack that we have had on all the times we stopped there, is this Vazhaipoo Pakoda, my daughter just loves it. The pakoda is so crispy and the vazhaipoo/banana flower/kele ke phool gives a nice taste to the pakodas. Usually in other restaurants, you'll find vazhaipoo vadai and cutlets but this pakora, I have not tasted anywhere else. I wanted to make it at home, I didn't have any recipe, so I just made it according to the taste that I remembered, asked my daughter to taste and waited for her verdict. She gave me a thumbs up, the pakoras tasted very good and I should say 99% close to the taste of the pakoras from the restaurant. Do try this the next time you buy banana flower, I am sure you'll love it..

Need To Have

  • Vazhaipoo - 21/2 cups
  • Chana Dal/Bengal Gram - 1/2 cup
  • Dried Red Chillies - 4
  • Garlic Cloves - 2 big
  • Fennel Seeds - 2 teaspoons
  • Rice Flour - 1 tablespoon
  • Turmeric Powder - 1/4 teaspoon
  • Curry Leaves - a big handful
  • Salt to taste

Method


          Wash and soak the chana dal for about 2 hours. Then grind it with red chillies, fennel seeds and garlic into a coarse paste without adding any water.


          Add it to the cleaned, washed and roughly chopped ( lengthwise ) vazhaipoo along with the rice flour, salt, curry leaves and turmeric powder and mix it well.


          Heat some oil for deep frying, take a handful of the mixture and drop it in the oil, spreading it out as you drop. Fry till golden, remove, drain the excess oil and serve it hot.


Note
Cleaning vazhaipoo takes some time, we have to remove the outer big brown petals, you'll see a bunch ( these only mature into bananas ), between each of the brown petals. We have to clean these small ones, remove the center thick stem and the onion like thing. This may sound a little complicated, I'll soon update about this with pictures.
Don't chop the banana flower into small pieces, just chop it coarsely, lengthwise.

Monday, June 13, 2016

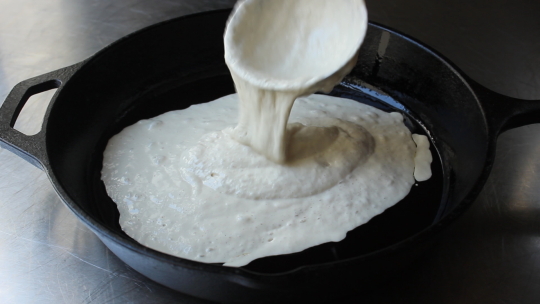
Pourable Pizza – The Great Liquid Dough Experiment

I once made a mini-pizza using a crumpet. No, I’m not starting a limerick.  Anyway, I toasted it nice and crisp, topped it with sauce and cheese, and it really was not bad. So I thought, what if this was much thinner, and made from the same ingredients as pizza dough? After a few tests, this pourable pizza was born.

Besides being kind of fun to make, this method features a few nice perks. There’s no kneading required, nor do you have to roll/stretch/spin your dough into shape. While thick crust pizza is relative easy to form at home, few can pull off stretching the dough really thin, so this is a very easy way to achieve that.

Also, the great challenge with homemade pizza is the under-cooked crust bottom, and this method allows for that crispy, near-charred bottom you usually only get from a pizza oven. Once topped, I like to finish under the broiler, but a 500 F. oven will also do the job nicely.

Please note, I’m not trying to replace the classic method with this drippy dough, but rather offer a possibly easier-in-some-ways alternative for your next pizza night. And yes, this does work for making thicker crusts. I hope you give this a try soon. Enjoy!


Ingredients for 4 eight-inch pizzas:
3 cups (14 ounces by weight) *flour
2 cups warm water (105-110 F)
1 package dry active yeast (2 1/4 teaspoons)
1 teaspoon kosher salt
1 1/2 teaspoons honey
1 tablespoon olive oil 

Note: Like I said in the video, use a whisk attachment, not a dough hook! You can also simply whisk this by hand for 5 minutes. 

* I used something called double-zero flour or “00” flour, which is an Italian flour used for pasta and pizza making. It is very finely milled, and lovely to work with. If you can’t get or find, just use all-purpose.

Next Up: A Pizza You Can Pour