Monday, May 9, 2016

Philly Cheesesteak Taquitos

 I always need an easy, on-the-go dinner. With kids in sports it's a must!
This is the perfect dinner for spring-time baseball games and the kids LOVE them! They're basically mess free for the car too:) 

Ingredients:

Olive oil
12-16oz roast beef deli meat, chopped small
2t Worcestershire sauce 
1 green pepper, finely chopped (or whatever color pepper you have on hand)
1 small onion, finely chopped
1 8oz package cream cheese, softened
10-12oz provolone cheese (I usually buy the deli slices)
10 flour tortillas

Directions:
In a large skillet over medium-high heat add the oil, beef and onion. Cook until tender. Add the Worcestershire sauce and pepper if desired. Cook and stir for 3-4 minutes. Remove from the heat and let cool slightly.

Preheat oven to 425°F. Line a baking sheet with parchment paper (or silpat liners) and set aside.

In a medium bowl, combine the beef mixture and cream cheese until thoroughly combined.

Spoon 2-3 tbsp. of the beef mixture onto each tortilla. Tear up provolone cheese and put a layer on top of the beef mixture. Roll the tortilla around the filling as tight as you can. Place seam-side down on the baking sheet. Repeat with remaining tortillas and filling. Make sure the taquitos are not touching.

Spray the tops of the taquitos lightly with cooking spray or brush lightly with olive oil and sprinkle with salt. Bake 15-20 minutes or until the taquitos are crisp and golden brown. Enjoy!!

*Adapted from Love Bakes Good Cakes


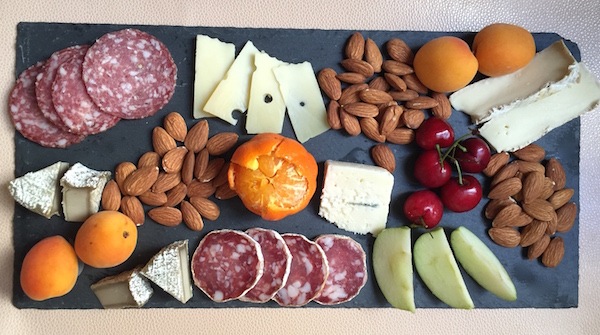
My Salami Story

In my parent’s kitchen there was a hook near the door. It pretty much always had Columbus Italian dry salami hanging from it. It never occurred to me that this was not the case in every house in America. When I was growing up it was my sister who had the sweet tooth, not me. I loved all things savory. I remember asking my mother if people could choose to be vegetarian, could I be a carnivore? I didn’t hate vegetables, I just loved salty foods. I still do. Some of my favorite things when I was young were thick cut potato chips, corn chips, smoked salmon and salami. 

California style Italian dry salami was an integral part of my childhood. I ate fat slabs of salami and thin slices. I ate the crusty ends, peeling off the white dusty paper. I ate it in sandwiches for lunch and for dinner when it was too hot to cook. We used to sit at a picnic table in the Summer on the deck with a big plate of cherry tomatoes, slices of cheese and salami. Take what you want, my mother would say. To us, it wasn’t an antipasto platter but a “take plate.” 

When I had one of my first jobs, working at a gourmet retail shop, I’d head off to a nearby Italian deli for lunch most days. They refused to sell sandwiches but would sell meat sliced to order and rolls and throw in packets of mustard and mayo so you could make a sandwich yourself. Salami with or without mortadella was my fuel and my soul food. Years later when I lived in Italy I discovered many other styles of Italian cured meats and other ways of serving it—proscuitto with Tuscan bread, mortadella draped over warm gnocco frito and various kinds of salami flavored with black pepper or fennel or red chiles. 

Italian dry salami it turns out, is a Bay Area speciality. According to an article in the Los Angeles Times, around 1970, local Bay Area salami producers, descendants of salami makers from Milan, Lucca, Parma and Modena formed the Dry Salami Institute and were able to convince the US Department of Agriculture that Italian dry salami should be made according to certain standards and the name protected against inferior products. It is really Italian? That’s hard to say since it’s made in America and has a pungent scent and flavor profile particular to this area. It’s definitely a Californian style of Italian salami and although producers like Columbus make many different varieties such as Calbrese, peppered and sopressata, nothing reminds me of my childhood quite like an Italian dry salami, hanging from a hook.

Salami tips:

Slicing
Here’s a simple rule—for smaller chubs, cut thicker slices and for larger ones, cut thinner slices. This will allow for the best taste, texture and aroma. 

Storing 
Although shelf stable, after you cut into a salami, it’s best to store it in the refrigerator to prevent dehydration. Salami needs humidity, so keep it in a moist plastic bag (you can include a wet paper towel in a resealable bag if necessary). 

Serving 
Salami is often served on an antipasto platter, but consider adding it to a fruit and cheese plate. It pairs well with so many things—nuts, stone fruit, grapes, apples, pears, grilled vegetables and olives. Let salami come to room temperature before serving. 

Disclaimer: My thanks to Columbus for inspiring this post and providing samples. I was not compensated monetarily for this or any other post on Cooking with Amy. 

Friday, May 6, 2016

Red Kidney Bean Jambalaya

Kidney Bean Jamalaya

This thick and hearty vegetable stew is a vegetarian version of the classic spicy Cajun jambalaya stew loaded with red kidney beans, brown rice and plenty of vegetables. And once the beans are cooked, it's essentially a simple one-pot meal with everything you need for a complete meal. The Cajun blend of herbs really complements everything in the dish and it makes a fair amount too so you can share with friends and have leftovers besides. Adjust the hot sauce according to taste, and be sure not to skip the liquid smoke as it adds an essential flavor.


Red Kidney Bean JambalayaRed Kidney Bean Jambalaya
Recipe by
Cuisine: American South
Published on May 6, 2016

Thick and hearty, spicy and smoky vegetarian version of Cajun jambalaya loaded with kidney beans, brown rice and plenty of vegetables

Print this recipePrint this recipe

Ingredients:
  • 2/3 cup dried kidney beans (2 cups cooked)
  • 2/3 cup dried brown rice (2 cups cooked)
  • 2 tablespoons olive oil
  • 1 small white or red onion, diced
  • 2 cloves garlic, minced or crushed
  • 2 medium carrots, sliced
  • 2 stalks celery, sliced
  • a few handfuls of green beans, chopped
  • 2 medium tomatoes, diced
  • 1 red bell pepper, seeded and chopped
  • 1 medium eggplant, chopped
  • 2 teaspoons ground sage
  • 2 teaspoons dried thyme
  • 1 teaspoon dried marjoram
  • 1 teaspoon celery seed
  • 3 cups vegetable stock
  • 1/2 to 1 teaspoon liquid smoke, to taste
  • 1 teaspoon sriracha or other hot sauce
  • 1 1/2 teaspoons sea salt, or to taste
  • fresh ground black pepper
Instructions:
  • Rinse the kidney beans and brown rice separately. Cover the kidney beans with water and soak for 8 hours or overnight. In a separate bowl, cover the brown rice with water and soak for 8 hours or overnight.

  • Drain and rinse the kidney beans, then transfer to a medium saucepan and cover with fresh water. Bring to a boil, reduce heat to medium-low, cover, and simmer for 1 hour or until just tender but not falling apart. Drain and set aside.

  • Heat the oil in a large saucepan over medium heat. When hot, add the onion and sauté for 5 minutes. Now add the garlic, carrots, celery and green beans, and stir for another 5 minutes. Next add the tomatoes, red pepper, eggplant, sage, thyme, marjoram and celery seed, and continue to stir for another few minutes.

  • Pour in the vegetable stock, liquid smoke, rice and the cooked kidney beans. Bring to a boil, reduce heat to medium low, cover, and cook, stirring occasionally, for 45 minutes or until the rice is tender. Add water as necessary if the stew becomes too dry.

  • Season with sriracha, salt and pepper, and taste for seasoning — add more liquid smoke, sriracha, salt, pepper or herbs as desired.

Makes 6 servings

Jamalaya

I'm sharing this with Jac's weekly Meat Free Mondays event.

Other kidney bean dishes to enjoy from my kitchen:
Kidney Bean Curry ( Rajma )
Spicy Kidney Bean and Chickpea Stew
Thai Coconut Mushroom Soup with Kidney Beans
Vegetarian Jamaican Patties

Wednesday, May 4, 2016

Goat Whey Workout Bars with Almond, Chia and Oats


http://schneiderchen.de | © 2016 | http://angiesrecipes.blogspot.com


Fiber-rich complex carbohydrates in organic oats are combined with protein-rich goat milk protein powder, almond flour and healthy fat from coconut oil. This is a healthy and delicious treat that promotes muscle growth and aids in recovery after a long hard workout. I have used stevia syrup here, but maple syrup or honey will work just great. If you are not fancy for diary-based protein, hemp protein and pumpkin seed protein are great alternatives.


  • 120 g Rolled oats, toasted and ground into flour
  • 60 g 100% Goat whey protein, vanilla flavoured
  • 100 g Almond flour
  • 30 g Chia seeds
  • 60 g Coconut oil, melted
  • 130 g Light coconut milk
  • 3 tbsp Plain stevia syrup

  1. To toast oats, cook in a dry skillet over medium-high heat, stirring occasionally, for 5 minutes or until they are golden brown. Set aside to cool, then grind into flour.
  2. Grease and line a 22cmx14cm rectangular pan with a plastic wrap.
  3. Combine toasted oat flour, goat whey powder, almond flour and chia in a bowl. Set aside.
    In a saucepan, add in coconut oil, coconut milk and stevia syrup. Heat gently over low heat, stirring occasionally, until coconut oil melted and the mixture well combined.
  4. Pour into the dry ingredients and thoroughly mix until everything is well combined. Press the mixture into the prepared pan and chill for at least 2 hours or overnight until firm. Slice and enjoy.


http://schneiderchen.de | © 2016 | http://angiesrecipes.blogspot.com


http://schneiderchen.de | © 2016 | http://angiesrecipes.blogspot.com


Sunday, May 1, 2016

No Croutons Required - Calling out for Vegetarian Soups and Salads


It's my turn to host No Croutons Required this month. Alternately hosted by my good friend Jacqueline of Tinned Tomatoes and Lisa's Kitchen, this event features vegetarian soups and salads.

It seems spring has finally arrived, so I expect we will be seeing more salads than soups, but those bloggers rolling into cooler temperatures will perhaps submit some soups.

It is easy to take part. Simply post a soup or salad on your blog. The few rules are only one submission per blogger and it must be vegetarian. Please link back to this announcement, Lisa's Kitchen and also Jacqueline's blog.

Then, add your recipe using the linky tool at the end of this post. Very much looking forward to all of the inspired creations this time around.


Friday, April 29, 2016

Creamy Chickpea, Mushroom and Brown Rice Casserole

Creamy Chickpea, Mushroom and Rice Casserole

My photo does not do this dish justice, but I assure you though that this casserole is not to be missed. For those of you who may have been raised on chicken pot pies, this creamy chickpea is very much like a vegan rendition of this comfort food classic, and it is really just as comforting to the contemporary vegetarian. It is easy to prepare, and with chickpeas, succulent mushrooms, brown rice and herbs, finished off with a cashew paste and some nutritional yeast, you have a complete and hearty meal with plenty of protein. I served it up with my classic Greek salad for a meal that was thoroughly enjoyed by all.


Creamy Chickpea, Mushroom and Brown Rice CasseroleCreamy Chickpea, Mushroom and Brown Rice Casserole
Recipe by
Adapted from The Great Vegan Bean Book: More than 100 Delicious Plant-Based Dishes Packed with the Kindest Protein in Town! - Includes Soy-Free and Gluten-Free Recipes!
Published on April 29, 2016

Simple, warming and wholesome baked chickpea and brown rice "comfort food" casserole

Print this recipePrint this recipe

Casserole:
  • 2/3 cups dried chickpeas (2 cups cooked)
  • 2/3 cup dried brown rice (2 cups cooked)
  • 2 tablespoons olive oil
  • 1 small red onion, chopped
  • 1 to 2 cloves garlic, minced or crushed
  • 2 medium carrots, diced
  • 2 cups button mushrooms, roughly chopped
  • 1 cup frozen green peas
  • 2 teaspoons dried sage
  • 2 teaspoons dried thyme
  • 1 teaspoon dried marjoram
  • 1 teaspoon celery seed
  • 2 1/2 cups water
  • 2 tablespoons nutritional yeast
  • 1 1/2 teaspoons sea salt
  • fresh ground black pepper
Cashew paste:
  • 1 cup raw cashews, soaked in 1/2 cup warm water for 1 hour
  • juice of 1 lemon (3 tablespoons)
  • pinch of sea salt
Instructions:
  • Rinse the chickpeas and brown rice separately and soak each in enough water to cover for 8 hours or overnight. Drain and rinse the chickpeas, then transfer to a small saucepan and cover with fresh water. Bring to a boil, reduce heat to medium-low, cover, and simmer for 1 1/2 hours or until tender. Drain and set aside.

  • Meanwhile, drain the rice and set aside.

  • Heat the oil in a large skillet over medium heat. When hot, add the onion and sauté for 5 minutes until soft. Now add the carrots and garlic and sauté for another few minutes. Add the mushrooms and sauté for another 5 minutes. Stir in the peas, cook for another few minutes, then stir in the sage, thyme, marjoram and celery seed.

  • Preheat an oven to 350°. Transfer the skillet contents to a large lightly greased casserole dish and pour in the rice and water. Cover and bake for 60 minutes.

  • While the casserole is in the oven, make up the cashew paste. Combine the cashews with their soaking water and the lemon juice and salt in a small food processor or blender. Process until smooth.

  • Take the casserole out of the oven, stir in the cashew paste, nutritional yeast, and salt and pepper. Stir in a little water if you want a thinner casserole. Cover and let sit for about 10 to 15 minutes before serving. Taste for seasoning and add more herbs and salt and pepper if desired.

Makes 6 to 8 servings

Other oven-baked dishes to enjoy:
Kidney Bean Casserole with Mushrooms and Spicy Tempeh Strips
Southern-Style Eggplant and Potato Casserole with Chickpeas
Gigantes Bean Tomato Casserole
Pasta and Feta Cheese Casserole

Wednesday, April 27, 2016

Sesame, Poppy and Peanut Bars (Vegan, Gluten Free)


http://schneiderchen.de | © 2016 | http://angiesrecipes.blogspot.com


http://schneiderchen.de | © 2016 | http://angiesrecipes.blogspot.com


Made with sesame, poppy seeds, coconut, roasted peanuts and maple syrup, these nutty seedy bars are chewy and packed with fiber and flavour. They can be made up to 3 days ahead and stored in an airtight container.


Sesame, Poppy and Peanut Bars (Vegan, Gluten Free)

adapted from Bon Appetit


  • 150 g A mix of white and black sesame seeds
  • 35 g Poppy seeds
  • 60 g Unsweetened shredded coconut
  • 40 g Unsalted, roasted peanuts
  • A large pinch of salt
  • 70 g Maple syrup
  • 2 tbsp Creamy peanut butter
  • 1/4 tsp Vanilla extract


  1. Preheat oven to 180C/350F. Butter a regular glass baking dish and line with parchment paper, leaving a generous overhang on all sides.
  2. Mix sesame, poppy seeds, coconut, peanuts, and salt in a large bowl. Mix maple syrup, peanut butter, and vanilla in a small bowl. Add to sesame seed mixture and mix well. 

  3. Scrape mixture into prepared baking dish and press firmly into an even layer. Bake until golden brown around the edges, 20–25 minutes. Transfer to a wire rack and let cool until firm, 30–40 minutes. Lift out of baking dish (if it starts to crumble, let cool longer) and cut into 16 bars. Let cool completely. 


http://schneiderchen.de | © 2016 | http://angiesrecipes.blogspot.com


http://schneiderchen.de | © 2016 | http://angiesrecipes.blogspot.com


Tuesday, April 26, 2016

Cool Cooking Tools Reviews & Giveaway!

It’s always fun to try out new cooking tools. While I don’t have room for much in my apartment kitchen,  I’ve put these small and affordable items to the test.

First up, the Uten 2-3 cup mini chopper. It has 3 blades and was terrific for a few cloves of garlic and fantastic for chopping olives and a handful of nuts, although I didn’t love it for chopping an onion, that's something I'd rather do by hand anyway. But the real reason I love this chopper? It’s fun to use! Instead of being plugged in or attaching to another kitchen appliance like a stick blender, it works with a pull string. You can pull the string as many or as few times as you like to get the result you want. If you have kids I bet they would love using it too. It's dishwasher safe and currently on sale for just $8.99. To learn more about Uten products, sales and more, visit and "like" their Facebook page.


I use my toaster oven for most of my baking. I always line my baking trays with parchment paper, foil or a silpat. But I recently discovered the Cookina parchminum sheet. Unlike parchment you can use it when broiling or baking up to 550 degrees. Unlike parchment, it won’t burn. Unlike foil, it’s easy to clean and reuse. Unlike a silpat, it won’t stain. One sheet is supposed to last as long as 25 sheets of parchment but I suspect it will last even longer. It’s amazingly durable. While you can serve off of it directly I haven’t really used it that way. I’ve used it to bake cookies, roast vegetables and cook fish. It's a less wasteful, more environmentally friendly solution, it rolls flat for storage, and is PFOA free. Suggested retail price is $9.99.
I have plenty of knives, the last thing I need is another one. BUT I was really impressed with the Crisp paring knife because it has a cover that doubles as a sharpener. This is just so smart. Paring knives get used a lot but they don’t get sharpened as often as they should. This inexpensive knife which retails for $9.99 is perfect for camping or traveling. It’s a really smart innovation. The handle is comfortable and has a rubber inset where you grip the knife which makes it very ergonomic. It’s handy to have a couple knives with covers to use when you’re away from home. Crisp also offers a small serrated and bird’s beak paring knives.


GIVEAWAY! 

Uten is offering one mini chopper, Cookinga is offering one sheet and Crisp is offering one paring knife to a lucky reader. Leave a comment telling me which you’d prefer, the chopper, cooking sheet or the paring knife. Only one entry per person and you must have a US mailing address to be eligible to win. Contest ends on Friday May 6. 2016.

Disclaimer: My thanks to the manufacturers and retailers offering these products I was not compensated monetarily for this or any other posts on Cooking with Amy. 

Sunday, April 24, 2016

Cowboy Lasagna

 Once again, another twist on a classic. I love this recipe because it's chock full of meat, just the way my hubby likes it. And the variety of meats give it a great flavor. I also love recipes in a casserole dish because I can make it early in the day, put it in the fridge, then just pop it in the oven. Perfect!!

Ingredients:
2T olive oil
1 pound ground beef
1 pound ground sausage (I use Jimmy Dean Regular sausage)
1/2 pound pepperoni, cut into quarters
16oz can diced fire-roasted tomatoes (regular can be substituted if you don't like fire roasted)
12oz can tomato paste
1T dried oregano
salt and pepper to taste
2 garlic cloves, minced
1 small onion, finely chopped
16oz lasagna noodles
16oz ricotta cheese
16oz mozzerella cheese (or any other grated cheese you like. I like to use a medley of mozzerella and cheddar)
1 cup grated Parmesan cheese

Directions:

In a large, heavy skillet over medium heat, add the oil and lightly brown the ground beef and sausage with the onion and garlic. Be sure to keep the meat chunky, not finely separated, while cooking. Add the pepperoni, tomatoes, tomato paste, oregano, salt, pepper and 2 cups water. Bring to a simmer and simmer, uncovered, for 30 minutes. (You can always use your own tomato or marinara sauce here, or use a canned sauce to save time. We all know we need a time saving option every once in a while.)

Preheat the oven to 350 degrees. Bring a pot of water to a boil. Cook the lasagna noodles according to the package directions, drain and then lay out flat on parchment paper or foil so they don't stick.

In the bottom of a 9-by-13-by-2-inch baking pan, spread a layer of the prepared sauce. Top with a layer of the lasagna noodles and the ricotta, mozzarella and Parmesan cheeses. Repeat, ending with the sauce, noodles and cheeses.

Bake until lightly browned and bubbling, about 40 minutes. Allow the dish to stand for 15 minutes before serving. Cut and serve. Enjoy the rustic goodness!!


Pin It

Friday, April 22, 2016

Ethiopian-Style Red Lentil and Okra in a Spicy Tomato Sauce

Ethiopian-Style Red Lentil with Okra in a Spicy Tomato Sauce

I haven't been posting much because I have been making recipes that have already been documented in this space. That said, I do have a recipe to present that has been sitting in my draft folder for quite a while. That's a shame, because it is a good one and not difficult to prepare either.

I'm especially fascinated with different cuisines and African food certainly stimulates the palate. This Ethiopian-style stew is spicy and tart yet mellowed out with the addition of silky okra, a vegetable I don't use as often as I should. High in nutrients and antioxidants, the taste is rather difficult to describe, but it does nicely fill out soups and stews and is often enjoyed breaded and fried.

Homemade berbere is a must here. It's of blend of chilies and aromatic spices that takes very little time at all to make up and it keeps well in a sealed glass jar for a good few months.

Green beans can been used in place of the okra is you please.

I served this dish with spiced teff cakes with sun-dried tomatoes but as with all Ethiopian vegetable dishes it would go also go well with injera bread, a spongey sourdough bread made with teff flour.

red lentil orka stew with teff cakes

Ethiopian-Style Red Lentil and Okra in a Spicy Tomato SauceEthiopian-Style Red Lentil and Okra in a Spicy Tomato Sauce
Recipe by
Adapted from Teff Love: Adventures in Vegan Ethiopian Cooking
Cuisine: Ethiopian
Published on April 22, 2016

Red lentils and okra simmered in a simple, spicy and aromatic Ethiopian-style tomato sauce

Print this recipePrint this recipe

Ingredients:
  • 1 cup dried red lentils
  • 5 cups water
  • 2 tablespoons olive oil
  • 1 red onion, diced
  • 2 cloves garlic, minced or crushed
  • 1-inch fresh ginger, grated or minced
  • 1 1/2 cups fresh or frozen okra, sliced into 1/2-inch pieces
  • 1 large tomato, diced
  • 1/2 teaspoon ground cumin
  • 1/2 teaspoon ground cinnamon
  • 1/4 teaspoon ground nutmeg
  • 1/4 teaspoon ground cardamon
  • 1/8 teaspoon ground cloves
  • 3 tablespoons berbere powder
  • 1 tablespoon paprika
  • 1 teaspoon sea salt, or to taste
  • fresh cracked black pepper, to taste
Instructions:
  • Rinse the lentils and add to a large heavy-bottomed saucepan. Pour in the water and bring to a boil over high heat. Reduce heat to medium and simmer, uncovered, for 10 minutes or until the lentils are cooked but still retain some firmness. Drain, reserving the cooking liquid, and set aside.

  • Wipe the saucepan dry. Add the oil and heat over medium-high heat. When hot, add the onion and sauté for 5 minutes or until softened and slightly browned on the edges. Toss in the garlic and ginger and stir for another minute.

  • Add the okra, tomato, cumin, cinnamon, nutmeg, cardamon and cloves, and stir well to combine. Reduce the heat to medium, cover, and simmer for about 10 minutes, stirring often, until the okra has started to soften. Stir in the berbere and paprika, increase the heat to high and add 2 cups of the reserved lentil cooking liquid. Bring to a boil, reduce heat to medium-low, cover, and simmer, stirring often, until the orka is tender, about 10 more minutes.

  • Stir in the lentils and a bit more of the reserved cooking liquid if necessary to thin the sauce. Cover and simmer for 5 to 8 minutes, stirring occasionally, until the sauce has thickened. Season with sea salt and black pepper.

  • Serve hot.

Makes 6 servings

Ethiopian-Style Okra with Lentils

I'm sharing this with Jacquline's weekly Meat Free Mondays event.

Other African recipes to try from Lisa's Vegetarian Kitchen:
Chickpea Patties Smothered in Vegetable Gravy
Mixed Vegetables in a Basic Ethiopian Kulet Sauce
Ethiopian-Style Hummus
Vegetarian Harira (Moroccan Chickpea and Lentil Stew)

Wednesday, April 20, 2016

Slow Cooker Sriracha Meatballs


http://schneiderchen.de | © 2016 | http://angiesrecipes.blogspot.com


This is a quick and easy slow cooker recipe. Sriracha and honey come together perfectly as the hot and sweet sauce. If you like the meatballs more sweet than spicy, then simply add more honey. The meatballs stay really moist and tender and the sauce soaks up a lot of the meaty flavour with that long and slow cooking process.


SauceMeatball

  • 100 g Sriracha sauce
  • 150 g Honey
  • 1 clove Garlic, minced
  • 1 tbsp Fresh lime juice
  • 1 Red onion, sliced

  • 500 g Ground beef
  • 4 tbsp Bread crumbs
  • 1 Egg
  • 1 tsp Sriracha
  • 1 clove Garlic, minced
  • Salt and freshly ground black pepper


  1. Combine sriracha, honey, minced garlic and lime juice in a slow cooker on high heat.
  2. In a large bowl add all the meatball ingredients and mix until well combined. Shape the mixture into meatballs about the size of pingpong balls.
  3. Stir sriracha sauce in the slow cooker until combined. Taste and add additional honey or sriracha as necessary to suit your heat preference. Add in sliced onions, then the meatballs. Reduce heat to medium and cook, covered, for 4-5 hours.


http://schneiderchen.de | © 2016 | http://angiesrecipes.blogspot.com


http://schneiderchen.de | © 2016 | http://angiesrecipes.blogspot.com