Friday, April 29, 2016

Creamy Chickpea, Mushroom and Brown Rice Casserole

Creamy Chickpea, Mushroom and Rice Casserole

My photo does not do this dish justice, but I assure you though that this casserole is not to be missed. For those of you who may have been raised on chicken pot pies, this creamy chickpea is very much like a vegan rendition of this comfort food classic, and it is really just as comforting to the contemporary vegetarian. It is easy to prepare, and with chickpeas, succulent mushrooms, brown rice and herbs, finished off with a cashew paste and some nutritional yeast, you have a complete and hearty meal with plenty of protein. I served it up with my classic Greek salad for a meal that was thoroughly enjoyed by all.


Creamy Chickpea, Mushroom and Brown Rice CasseroleCreamy Chickpea, Mushroom and Brown Rice Casserole
Recipe by
Adapted from The Great Vegan Bean Book: More than 100 Delicious Plant-Based Dishes Packed with the Kindest Protein in Town! - Includes Soy-Free and Gluten-Free Recipes!
Published on April 29, 2016

Simple, warming and wholesome baked chickpea and brown rice "comfort food" casserole

Print this recipePrint this recipe

Casserole:
  • 2/3 cups dried chickpeas (2 cups cooked)
  • 2/3 cup dried brown rice (2 cups cooked)
  • 2 tablespoons olive oil
  • 1 small red onion, chopped
  • 1 to 2 cloves garlic, minced or crushed
  • 2 medium carrots, diced
  • 2 cups button mushrooms, roughly chopped
  • 1 cup frozen green peas
  • 2 teaspoons dried sage
  • 2 teaspoons dried thyme
  • 1 teaspoon dried marjoram
  • 1 teaspoon celery seed
  • 2 1/2 cups water
  • 2 tablespoons nutritional yeast
  • 1 1/2 teaspoons sea salt
  • fresh ground black pepper
Cashew paste:
  • 1 cup raw cashews, soaked in 1/2 cup warm water for 1 hour
  • juice of 1 lemon (3 tablespoons)
  • pinch of sea salt
Instructions:
  • Rinse the chickpeas and brown rice separately and soak each in enough water to cover for 8 hours or overnight. Drain and rinse the chickpeas, then transfer to a small saucepan and cover with fresh water. Bring to a boil, reduce heat to medium-low, cover, and simmer for 1 1/2 hours or until tender. Drain and set aside.

  • Meanwhile, drain the rice and set aside.

  • Heat the oil in a large skillet over medium heat. When hot, add the onion and sauté for 5 minutes until soft. Now add the carrots and garlic and sauté for another few minutes. Add the mushrooms and sauté for another 5 minutes. Stir in the peas, cook for another few minutes, then stir in the sage, thyme, marjoram and celery seed.

  • Preheat an oven to 350°. Transfer the skillet contents to a large lightly greased casserole dish and pour in the rice and water. Cover and bake for 60 minutes.

  • While the casserole is in the oven, make up the cashew paste. Combine the cashews with their soaking water and the lemon juice and salt in a small food processor or blender. Process until smooth.

  • Take the casserole out of the oven, stir in the cashew paste, nutritional yeast, and salt and pepper. Stir in a little water if you want a thinner casserole. Cover and let sit for about 10 to 15 minutes before serving. Taste for seasoning and add more herbs and salt and pepper if desired.

Makes 6 to 8 servings

Other oven-baked dishes to enjoy:
Kidney Bean Casserole with Mushrooms and Spicy Tempeh Strips
Southern-Style Eggplant and Potato Casserole with Chickpeas
Gigantes Bean Tomato Casserole
Pasta and Feta Cheese Casserole

Wednesday, April 27, 2016

Sesame, Poppy and Peanut Bars (Vegan, Gluten Free)


http://schneiderchen.de | © 2016 | http://angiesrecipes.blogspot.com


http://schneiderchen.de | © 2016 | http://angiesrecipes.blogspot.com


Made with sesame, poppy seeds, coconut, roasted peanuts and maple syrup, these nutty seedy bars are chewy and packed with fiber and flavour. They can be made up to 3 days ahead and stored in an airtight container.


Sesame, Poppy and Peanut Bars (Vegan, Gluten Free)

adapted from Bon Appetit


  • 150 g A mix of white and black sesame seeds
  • 35 g Poppy seeds
  • 60 g Unsweetened shredded coconut
  • 40 g Unsalted, roasted peanuts
  • A large pinch of salt
  • 70 g Maple syrup
  • 2 tbsp Creamy peanut butter
  • 1/4 tsp Vanilla extract


  1. Preheat oven to 180C/350F. Butter a regular glass baking dish and line with parchment paper, leaving a generous overhang on all sides.
  2. Mix sesame, poppy seeds, coconut, peanuts, and salt in a large bowl. Mix maple syrup, peanut butter, and vanilla in a small bowl. Add to sesame seed mixture and mix well. 

  3. Scrape mixture into prepared baking dish and press firmly into an even layer. Bake until golden brown around the edges, 20–25 minutes. Transfer to a wire rack and let cool until firm, 30–40 minutes. Lift out of baking dish (if it starts to crumble, let cool longer) and cut into 16 bars. Let cool completely. 


http://schneiderchen.de | © 2016 | http://angiesrecipes.blogspot.com


http://schneiderchen.de | © 2016 | http://angiesrecipes.blogspot.com


Tuesday, April 26, 2016

Cool Cooking Tools Reviews & Giveaway!

It’s always fun to try out new cooking tools. While I don’t have room for much in my apartment kitchen,  I’ve put these small and affordable items to the test.

First up, the Uten 2-3 cup mini chopper. It has 3 blades and was terrific for a few cloves of garlic and fantastic for chopping olives and a handful of nuts, although I didn’t love it for chopping an onion, that's something I'd rather do by hand anyway. But the real reason I love this chopper? It’s fun to use! Instead of being plugged in or attaching to another kitchen appliance like a stick blender, it works with a pull string. You can pull the string as many or as few times as you like to get the result you want. If you have kids I bet they would love using it too. It's dishwasher safe and currently on sale for just $8.99. To learn more about Uten products, sales and more, visit and "like" their Facebook page.


I use my toaster oven for most of my baking. I always line my baking trays with parchment paper, foil or a silpat. But I recently discovered the Cookina parchminum sheet. Unlike parchment you can use it when broiling or baking up to 550 degrees. Unlike parchment, it won’t burn. Unlike foil, it’s easy to clean and reuse. Unlike a silpat, it won’t stain. One sheet is supposed to last as long as 25 sheets of parchment but I suspect it will last even longer. It’s amazingly durable. While you can serve off of it directly I haven’t really used it that way. I’ve used it to bake cookies, roast vegetables and cook fish. It's a less wasteful, more environmentally friendly solution, it rolls flat for storage, and is PFOA free. Suggested retail price is $9.99.
I have plenty of knives, the last thing I need is another one. BUT I was really impressed with the Crisp paring knife because it has a cover that doubles as a sharpener. This is just so smart. Paring knives get used a lot but they don’t get sharpened as often as they should. This inexpensive knife which retails for $9.99 is perfect for camping or traveling. It’s a really smart innovation. The handle is comfortable and has a rubber inset where you grip the knife which makes it very ergonomic. It’s handy to have a couple knives with covers to use when you’re away from home. Crisp also offers a small serrated and bird’s beak paring knives.


GIVEAWAY! 

Uten is offering one mini chopper, Cookinga is offering one sheet and Crisp is offering one paring knife to a lucky reader. Leave a comment telling me which you’d prefer, the chopper, cooking sheet or the paring knife. Only one entry per person and you must have a US mailing address to be eligible to win. Contest ends on Friday May 6. 2016.

Disclaimer: My thanks to the manufacturers and retailers offering these products I was not compensated monetarily for this or any other posts on Cooking with Amy. 

Sunday, April 24, 2016

Cowboy Lasagna

 Once again, another twist on a classic. I love this recipe because it's chock full of meat, just the way my hubby likes it. And the variety of meats give it a great flavor. I also love recipes in a casserole dish because I can make it early in the day, put it in the fridge, then just pop it in the oven. Perfect!!

Ingredients:
2T olive oil
1 pound ground beef
1 pound ground sausage (I use Jimmy Dean Regular sausage)
1/2 pound pepperoni, cut into quarters
16oz can diced fire-roasted tomatoes (regular can be substituted if you don't like fire roasted)
12oz can tomato paste
1T dried oregano
salt and pepper to taste
2 garlic cloves, minced
1 small onion, finely chopped
16oz lasagna noodles
16oz ricotta cheese
16oz mozzerella cheese (or any other grated cheese you like. I like to use a medley of mozzerella and cheddar)
1 cup grated Parmesan cheese

Directions:

In a large, heavy skillet over medium heat, add the oil and lightly brown the ground beef and sausage with the onion and garlic. Be sure to keep the meat chunky, not finely separated, while cooking. Add the pepperoni, tomatoes, tomato paste, oregano, salt, pepper and 2 cups water. Bring to a simmer and simmer, uncovered, for 30 minutes. (You can always use your own tomato or marinara sauce here, or use a canned sauce to save time. We all know we need a time saving option every once in a while.)

Preheat the oven to 350 degrees. Bring a pot of water to a boil. Cook the lasagna noodles according to the package directions, drain and then lay out flat on parchment paper or foil so they don't stick.

In the bottom of a 9-by-13-by-2-inch baking pan, spread a layer of the prepared sauce. Top with a layer of the lasagna noodles and the ricotta, mozzarella and Parmesan cheeses. Repeat, ending with the sauce, noodles and cheeses.

Bake until lightly browned and bubbling, about 40 minutes. Allow the dish to stand for 15 minutes before serving. Cut and serve. Enjoy the rustic goodness!!


Pin It

Friday, April 22, 2016

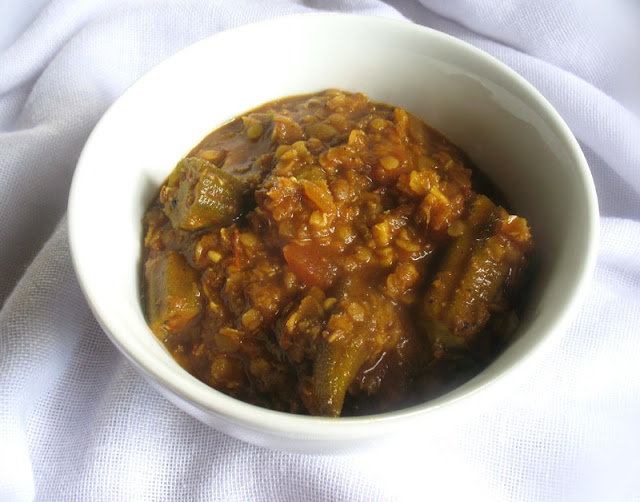
Ethiopian-Style Red Lentil and Okra in a Spicy Tomato Sauce

Ethiopian-Style Red Lentil with Okra in a Spicy Tomato Sauce

I haven't been posting much because I have been making recipes that have already been documented in this space. That said, I do have a recipe to present that has been sitting in my draft folder for quite a while. That's a shame, because it is a good one and not difficult to prepare either.

I'm especially fascinated with different cuisines and African food certainly stimulates the palate. This Ethiopian-style stew is spicy and tart yet mellowed out with the addition of silky okra, a vegetable I don't use as often as I should. High in nutrients and antioxidants, the taste is rather difficult to describe, but it does nicely fill out soups and stews and is often enjoyed breaded and fried.

Homemade berbere is a must here. It's of blend of chilies and aromatic spices that takes very little time at all to make up and it keeps well in a sealed glass jar for a good few months.

Green beans can been used in place of the okra is you please.

I served this dish with spiced teff cakes with sun-dried tomatoes but as with all Ethiopian vegetable dishes it would go also go well with injera bread, a spongey sourdough bread made with teff flour.

red lentil orka stew with teff cakes

Ethiopian-Style Red Lentil and Okra in a Spicy Tomato SauceEthiopian-Style Red Lentil and Okra in a Spicy Tomato Sauce
Recipe by
Adapted from Teff Love: Adventures in Vegan Ethiopian Cooking
Cuisine: Ethiopian
Published on April 22, 2016

Red lentils and okra simmered in a simple, spicy and aromatic Ethiopian-style tomato sauce

Print this recipePrint this recipe

Ingredients:
  • 1 cup dried red lentils
  • 5 cups water
  • 2 tablespoons olive oil
  • 1 red onion, diced
  • 2 cloves garlic, minced or crushed
  • 1-inch fresh ginger, grated or minced
  • 1 1/2 cups fresh or frozen okra, sliced into 1/2-inch pieces
  • 1 large tomato, diced
  • 1/2 teaspoon ground cumin
  • 1/2 teaspoon ground cinnamon
  • 1/4 teaspoon ground nutmeg
  • 1/4 teaspoon ground cardamon
  • 1/8 teaspoon ground cloves
  • 3 tablespoons berbere powder
  • 1 tablespoon paprika
  • 1 teaspoon sea salt, or to taste
  • fresh cracked black pepper, to taste
Instructions:
  • Rinse the lentils and add to a large heavy-bottomed saucepan. Pour in the water and bring to a boil over high heat. Reduce heat to medium and simmer, uncovered, for 10 minutes or until the lentils are cooked but still retain some firmness. Drain, reserving the cooking liquid, and set aside.

  • Wipe the saucepan dry. Add the oil and heat over medium-high heat. When hot, add the onion and sauté for 5 minutes or until softened and slightly browned on the edges. Toss in the garlic and ginger and stir for another minute.

  • Add the okra, tomato, cumin, cinnamon, nutmeg, cardamon and cloves, and stir well to combine. Reduce the heat to medium, cover, and simmer for about 10 minutes, stirring often, until the okra has started to soften. Stir in the berbere and paprika, increase the heat to high and add 2 cups of the reserved lentil cooking liquid. Bring to a boil, reduce heat to medium-low, cover, and simmer, stirring often, until the orka is tender, about 10 more minutes.

  • Stir in the lentils and a bit more of the reserved cooking liquid if necessary to thin the sauce. Cover and simmer for 5 to 8 minutes, stirring occasionally, until the sauce has thickened. Season with sea salt and black pepper.

  • Serve hot.

Makes 6 servings

Ethiopian-Style Okra with Lentils

I'm sharing this with Jacquline's weekly Meat Free Mondays event.

Other African recipes to try from Lisa's Vegetarian Kitchen:
Chickpea Patties Smothered in Vegetable Gravy
Mixed Vegetables in a Basic Ethiopian Kulet Sauce
Ethiopian-Style Hummus
Vegetarian Harira (Moroccan Chickpea and Lentil Stew)

Wednesday, April 20, 2016

Slow Cooker Sriracha Meatballs


http://schneiderchen.de | © 2016 | http://angiesrecipes.blogspot.com


This is a quick and easy slow cooker recipe. Sriracha and honey come together perfectly as the hot and sweet sauce. If you like the meatballs more sweet than spicy, then simply add more honey. The meatballs stay really moist and tender and the sauce soaks up a lot of the meaty flavour with that long and slow cooking process.


SauceMeatball

  • 100 g Sriracha sauce
  • 150 g Honey
  • 1 clove Garlic, minced
  • 1 tbsp Fresh lime juice
  • 1 Red onion, sliced

  • 500 g Ground beef
  • 4 tbsp Bread crumbs
  • 1 Egg
  • 1 tsp Sriracha
  • 1 clove Garlic, minced
  • Salt and freshly ground black pepper


  1. Combine sriracha, honey, minced garlic and lime juice in a slow cooker on high heat.
  2. In a large bowl add all the meatball ingredients and mix until well combined. Shape the mixture into meatballs about the size of pingpong balls.
  3. Stir sriracha sauce in the slow cooker until combined. Taste and add additional honey or sriracha as necessary to suit your heat preference. Add in sliced onions, then the meatballs. Reduce heat to medium and cook, covered, for 4-5 hours.


http://schneiderchen.de | © 2016 | http://angiesrecipes.blogspot.com


http://schneiderchen.de | © 2016 | http://angiesrecipes.blogspot.com


Sunday, April 17, 2016

Cinnabon Cinnamon Rolls with Whipped Cream Cheese Frosting

I thought I had the whole cinnamon roll thing figured out. I had a recipe that was no-fail and tasted great. And THAT is the reason why you should always be trying new recipes. You never know what you're going to miss!! For some reason I wondered if there was a better recipe out there for cinnamon rolls. I found this one and I will NEVER go back. They're absolutely perfect!

  
 I mean look at them! Have you ever seen a yummier cinnamon roll, besides Cinnabon?! They're so soft, buttery and the perfect ratio of bun to cinnamon gooeyness.


 Don't pass up this opportunity to make and eat amazing cinnamon rolls at home!

For the dough:
3/4 cup warm water
2 1/4 teaspoons active dry yeast
1/2 cup granulated sugar
1/2 teaspoon salt
1/4 cup buttermilk, room temperature
1 egg
1/3 cup oil
4 and 1/2 - 5 cups all-purpose flour

For the filling:
1 and 1/4 cups light brown sugar
2 and 1/2 tablespoons ground cinnamon
2 tablespoons cornstarch
1/2 cup (8 tablespoons) unsalted butter, room temperature

For the whipped cream cheese frosting:
1 8oz cream cheese, room temperature
1/4 cup (4 tablespoons) unsalted butter, room temperature
1 t vanilla
1 and 1/4 cups powdered sugar, sifted
1/2 cup heavy whipping cream 
1T powdered sugar

Directions:

In the bowl of a stand mixer fitted with a dough hook, add water, yeast, and 1 tablespoon of the granulated sugar ( I measure the 1/2 cup sugar then take 1T from that.) Stir together, then let the yeast rise for about 5-10 minutes. In a small bowl, whisk together buttermilk, egg, and oil until well-combined. After 10 minutes, the yeast should look frothy and bubbly. At this point, pour in the buttermilk mixture, remaining sugar, and salt, and stir together for 10-15 seconds.

Pour in 2 cups of the measured flour, and stir on low speed until incorporated. Continue to pour in flour, 1/4 cup at a time, until the dough pulls away from the bowl and bowl starts to look clean. Increase speed to medium and knead for 5 minutes. The dough should be slightly sticky, but not sticky enough to stick to your fingers when touched.

Transfer dough to a greased bowl, cover with plastic wrap, then set aside in a warm place to rise for 1-2 hours, or until dough has doubled in size. I usually heat my oven up to 100 degrees then turn it off.

Meanwhile, prepare the filling. In a small bowl, mix together brown sugar, cinnamon, and cornstarch until combined. 

Butter an 11x15 inch glass baking dish (or 1 9x13 and an 8x8 square pan or pie dish).

Once dough has risen, liberally flour a large, clean work surface. Punch down the dough to remove air bubbles, then transfer it to the work surface. Roll the dough out into a large rectangle, roughly 20x30 inches wide. Spread softened butter over the surface of the dough, leaving a 1-inch strip on the edge of the dough farthest from you untouched. Spread the room temperature butter evenly over the dough. Evenly sprinkle cinnamon sugar mixture over the butter, then use a rolling pin to gently roll over the mixture and slightly press it into the butter. This can get the rolling pin really messy, but necessary for the filling not to fall out after you've rolled it up.

Starting with the edge of the dough closest to you, gently roll up the dough into a tight log, sealing it with the strip of dough you left untouched. Cut off any uneven ends. Score dough every two inches, then use those marks to evenly slice your dough into rolls.

Place rolls into parchment paper lined baking dish. Cover with plastic wrap, then set aside in a warm place to rise 1-2 hours, or until rolls have doubled in size and are almost touching each other. Bake in preheated 350 degree oven for 15-17 minutes, or until tops start to brown. Do not overbake!

While rolls are baking, prepare your frosting. In a bowl, using an electric hand mixer, beat together butter and cream cheese until smooth and creamy. Add vanilla and beat until combined. Pour in powdered sugar and mix on low speed just until incorporated. Then, increase speed to high and beat for an additional 5 minutes, or until frosting turns white. In a separate bowl, whip the cream and 1T powdered sugar until stiff peaks form. Fold it into the cream cheese mixture.

Once you remove the rolls from the oven, spread half of the frosting on top of them. This layer will melt into the rolls. Once they've cooled down, spread on the remaining frosting. Serve warm or reheat before serving.ENJOY!!
 
*Adapted from Culinary Couture
Pin It

Friday, April 15, 2016

Cauliflower, Carrot and Green Pea Curry with Coconut Milk

cauliflower curry

A few months back cauliflower was ridiculously expensive. It cost about 8 dollars for a head here in Ontario. Of course, most shoppers weren't buying it and as a consequence the price has now come down to a reasonable level. So why not try this simple but delightful Indian curry that includes fresh cauliflower and carrots with green peas, creamy coconut milk, vibrant spices, tangy tomato and lemon juice? It makes for a colorful and satisfying side to go along with your favorite Indian dishes.


Cauliflower, Carrot and Green Pea Curry with Coconut MilkCauliflower, Carrot and Green Pea Curry with Coconut Milk
Recipe by
Cuisine: Indian
Published on April 15, 2016

A simple, fresh and vibrant vegetable curry with cauliflower, carrots and green peas simmered in a zesty tomato and coconut milk sauce

Print this recipePrint this recipe

Ingredients:
  • 1 tablespoon coconut oil
  • 1 small red onion, finely chopped
  • small handful of dried curry leaves, crumbled
  • 1 to 2 red or green chilies, seeded and minced
  • 1-inch piece fresh ginger, grated or minced
  • 2 cloves garlic, crushed or minced
  • 2 teaspoons ground coriander
  • 1 teaspoon ground cumin
  • 1/2 teaspoon turmeric
  • 1/2 teaspoon ground mustard
  • 1/4 teaspoon cayenne
  • 2 medium tomatoes, finely chopped
  • 2 teaspoons poppy seeds
  • 2/3 cup coconut milk
  • 1/3 cup water
  • 1 small head cauliflower, cut into small florets
  • 1 large carrot, chopped
  • 1 cup frozen green peas, defrosted
  • 1 teaspoon sea salt
  • 1/2 teaspoon garam masala
  • juice from 1 small lemon (2 tablespoons)
  • a few tablespoons of fresh chopped parsley, for garnish
Instructions:
  • Heat the oil in a large saucepan over medium heat. When hot, add the onion and sauté for 5 minutes until softened. Add the curry leaves, chilies, ginger and garlic, and stir for another few minutes.

  • Add the coriander, cumin, turmeric, mustard and cayenne, and stir for another minute. Next add the tomatoes and cook until thickened, about 5 minutes.

  • Now add the poppy seeds, coconut milk, cauliflower, carrots and salt. Cover and simmer for 10 minutes. Then add the peas and cook for another 10 to 15 minutes until the vegetables are tender. Stir in the garam masala and lemon juice. Taste for seasoning and adjust accordingly.

  • Serve hot garnished with fresh chopped parsley.

Makes 4 servings

Cauliflower, Carrot and Green Pea Curry with Coconut Milk

Other cauliflower recipes to enjoy:
Aloo Gobi (Curried Cauliflower and Potatoes)
Cauliflower & Olive Salad
Chickpea Patties Smothered in Vegetable Gravy
Roasted Cauliflower Bites with Sriracha Sauce

Thursday, April 14, 2016

Roast Chicken with Asparagus & Leeks Recipe + Giveaway!

Foster Farms is one of the larger suppliers of chicken in California. It’s a brand you’ll find in most supermarkets. So I was pleased to learn they are now offering organic chicken. At my local supermarket they only had boneless and skinless breasts and thighs, and while I much prefer purchasing whole chickens I did want to give the product a try. 

Because I don’t usually, if ever, cook with boneless skinless chicken thighs, I turned to the ever dependable Faith Durand at The Kitchn for a foolproof technique. I added an herb paste, asparagus and leeks and reduced the pan sauce to make a glaze. It’s easy peasy and great for a quick meal that will be done in just over 30 minutes. The leeks, asparagus and herbs give the dish a fresh and light feel. 

Although I purchased the chicken with my own money, I did accept four $20 Safeway gift cards for you, my readers, from Foster Farms. If you would like one, please leave a comment about your favorite chicken thigh or breast recipe. Only one entry per person and you must have a US mailing address to be eligible to win. Contest ends Friday April 22nd, 2016. As usual, winners will be picked at random. 


Roast Chicken with Asparagus and Leeks
Serves 4 

Ingredients 

3/4 cup of fresh mild green herbs (I used cilantro, parsley and dill)
1 clove garlic
1/2 teaspoon lemon zest
1 teaspoon olive oil 
2 cups thinly sliced leeks, white and pale greeen
1 package of skinless and boneless chicken thighs, about 1.25 pounds
Salt
Freshly ground pepper
2 cups medium thick asparagus, cut on the diagonal

Instructions 

Preheat the oven to 425 degrees. Finely mince the herbs, garlic and lemon zest and drizzle in the oil--or process in a mini food processor. Rub the chicken with the herb mixture. 

Place the leeks in a 10-inch oven proof skillet. Place the chicken on top of the leeks and season generously with salt and pepper.  Roast for 10 minutes, then tuck the asparagus in and around the chicken and roast another 10 minutes or until the chicken reaches 165 degrees when pierced with an instant read thermometer. 

Remove from the oven, cover with foil and let rest for 10 minutes. Transfer the chicken and vegetables to a platter and place the skillet on the stove. Heat the skillet and reduce the liquid until only a few tablespoons remain. Drizzle the glaze over the chicken. 

Enjoy! 

Disclaimer: My thanks to Foster Farms for providing the gift card. I was in no way compensated for this post because I wanted you to know my true feelings about the product. 

Wednesday, April 13, 2016

Overnight Spelt Einkorn Bread


http://schneiderchen.de | © 2016 | http://angiesrecipes.blogspot.com


http://schneiderchen.de | © 2016 | http://angiesrecipes.blogspot.com


http://schneiderchen.de | © 2016 | http://angiesrecipes.blogspot.com


This is a simple sandwich loaf made with my favourite einkorn and spelt, risen with less yeast and wonderful flavour which comes from the long, slow, overnight fermentation in the fridge.


Overnight Spelt Einkorn Bread

inspired by this


  • 3 g Fresh yeast
  • 1 tbsp Maple syrup
  • 40 ml Warm water
  • 180 ml Soya milk, lukewarm
  • 250 g Spelt bread flour
  • 120 g Einkorn flour
  • 1/2 tsp Sea salt
  • 20 g Olive oil
  • 1 tbsp Oat flour for dusting


  1. Place the yeast, maple syrup and warm water in a bowl. Whisk with a fork to dissolve yeast. Stand in a warm place for 10 minutes or until frothy.
  2. Place spelt bread flour, and einkorn flour into a large bowl. Stir in sea salt, yeast mixture and olive oil. Mix to form a soft dough, about 10 minutes. Turn out onto a lightly floured surface. Knead for 5 minutes or until smooth and elastic. Place in a large, lightly greased bowl. Cover and leave in a cool place to rest for 2 hours.
  3. Lightly grease a standard loaf pan. Knock back the dough and knead until smooth. Shape into a log. Place in the prepared pan. Cover with lightly greased plastic wrap and leave overnight (8-10 hours) to rise in the fridge.
  4. Take it out of the fridge next morning and put it somewhere warm to carry on rising: it could take from 1 to 3 hours. Preheat oven to 200C/400F fan-forced.
  5. Lightly dust the risen dough with oat flour. Bake in the hot oven for 10 minutes, then turn down the temperature to 180C/200C fan-forced, and bake for a further 25 minutes or until golden and hollow-sounding when tapped. Turn onto a wire rack to cool.


http://schneiderchen.de | © 2016 | http://angiesrecipes.blogspot.com


http://schneiderchen.de | © 2016 | http://angiesrecipes.blogspot.com


http://schneiderchen.de | © 2016 | http://angiesrecipes.blogspot.com