Monday, December 21, 2015

Traditional Christmas roast (oven-baked pork shoulder with honey, mustard and rosemary)

From the recipe archives (originally posted in December 2012. Still my favourite Christmas roast). My traditional Christmas roast / Traditsiooniline jõulupraad
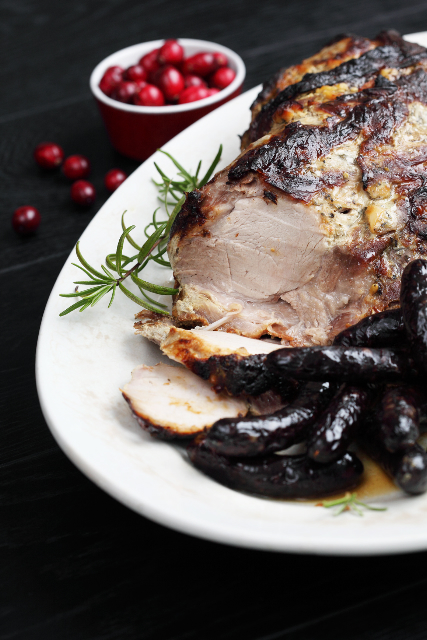
Photo by Juta Kübarsepp for the December issue of Kodu ja Aed magazine, 2012 

What's your traditional Christmas roast (assuming you're eating meat)? Turkey? Goose? Duck?

In Estonia it's definitely pork, though roast poultry has become more popular during recent years. I've been flirting with roast goose and actually served duck leg confit on Christmas Eve this year. It was delicious.

However, for years I've been serving pork roast - a pork shoulder (kaelakarbonaad in Estonian) in a mustard-honey-garlic-rosemary marinade, to be more precise. I love that it's a pretty fool-proof recipe, simple to make, with lots of flavour. And - as an added bonus - any leftovers are excellent on top of rye bread on the days after the party, or as part of a salad. So if you're not making it for a big family feast, you can still make the same amount and simply make several meals out of it.

So here you go. Nami-Nami's traditional Christmas roast. On the photo above, it's accompanied by black pudding ('blood sausages') - another traditional Christmas dish.

Wish you all a lovely festive season!!!

Traditional Christmas roast
(Ahjupraad karbonaadist)
Serves about 10

2 kg boneless pork shoulder (Boston butt)
3-4 Tbsp honey
3-4 Tbsp Dijon mustard or Estonian Põltsamaa mustard
2-3 fresh rosemary sprigs (leaves only)
3 large garlic cloves
2 tsp sea salt

Finely chop garlic cloves and rosemary leaves, then mix with honey and mustard until combined.
Season the meat generously with salt, then spread the mustard-honey mixture all over the pork shoulder and massage into the meat.
Place the pork shoulder into a large ovenproof dish, cover with foil and place into a fridge or cold larder for 1-2 days.
Bring back to the room temperature about an hour before you plan to cook the meat.
If you have a meat thermometer, then stick it into the thickest part of the meat (you can do this through the kitchen foil).
Roast the meat in a pre-heated 160 C / 320 F oven for about 2,5 hours or until the meat thermometer has reached 82-85 C/ 180-185 F.
If you plan to serve gravy with your meat, then pour a cup of hot water into the baking tray half-way through the cooking. 
When the meat is cooked, remove the foil, season the meat once more lightly with salt and then bake for another 10-15 minutes at about 200-220 C/ 390-425 F, just to brown the meat  a little.

Remove the roast pork from the oven, cover again with a kitchen foil and leave to rest for 20-30 minutes before carving into thin slices.

This recipe was also included in my latest cookbook, Jõulud kodus ("Christmas at Home"), published in Estonian in November 2011. 
I also included the recipe in the December 2012 issue of Kodu & Aed magazine. 

Sunday, October 11, 2015

Baked Pumpkin Cream Cheese French Toast

 Fall? Hello, Fall? Where are you?! Why are you torturing me with 90 degrees still? It's not very nice when I want to bake all of these yummy fall dishes. So I bake them anyway:)
 This casserole will change breakfast for you. Making breakfast before bed and then just popping it in the oven in the morning...YES PLEASE! I'm always worried that these overnight casseroles will be to wet and gooey for me. Not the case AT ALL. This bakes up so firm and delicious.
And aren't pumpkin and cream cheese married? They are in my book. They belong together. And they're so happy together. If you're looking for the perfect Fall breakfast look no further!      

3/4 cup milk
1/2 cup pumpkin puree
3 eggs
2 teaspoons pumpkin pie spice
1 teaspoon vanilla
1/4 cup brown sugar, packed
1 (12-count) package Kings Hawaiian Sweet Dinner Rolls, cubed
  
For the crumb topping 
1/4 cup flour
1/4 cup brown sugar, packed
1/2 teaspoon cinnamon
1/4 cup butter, cut into cubes
1/4 cup chopped pecans (Optional. I didn't have them this time so I left them out)
2 tablespoons powdered sugar 
  
For the cream cheese filling 
8 ounces cream cheese, at room temperature
1/3 cup powdered sugar
1/4 teaspoon ground cinnamon

 In bowl of an electric mixer fitted with paddle attachment, beat cream cheese, sugar and cinnamon on medium speed until light and fluffy, approximately 2-3 minutes; set aside.

In a large glass measuring cup or another bowl, whisk together milk, pumpkin puree, eggs, pumpkin pie spice, brown sugar and vanilla. Lightly coat a 9x13 baking dish with nonstick spray. Place a layer of bread cubes evenly into the baking dish. Pour half of the pumpkin puree mixture evenly over the top. Spread cream cheese filling in an even layer. Top with remaining bread cubes and pumpkin puree mixture to completely cover the filling. Cover and place in the refrigerator for at least 2 hours or overnight.

To make the crumb topping, combine flour, sugar and cinnamon in a small bowl. Add cold butter and toss to coat, using your fingers to work the butter into the dry ingredients until it resembles coarse crumbs. You can also do this in a food processor or with a fork or pastry cutter. Place the crumb topping in the fridge until ready to bake NOT on top of the casserole, but in a separate bowl. Sprinkle the crumb topping evenly over casserole right before putting into the oven. 

Preheat oven to 350 degrees. Place into oven and bake for 35-45 minutes, or until golden brown and cooked all the way through. Serve immediately, sprinkled with pecans and powdered sugar, if desired.

Enjoy!!

Saturday, October 3, 2015

It's cinnamon bun day (kanelbullens dag)!

Korvapuustit / Finnish cinnamon rolls / Soome kaneelisaiad

It's Cinnamon Bun Day in Sweden today. Cinnamon Bun Day was established in 1999, or 16 years ago, when Swedish Home Baking Council (Hembakningsrådet) came up with the idea when looking for a way to celebrate their 40th anniversary. Many Swedes rush to their favourite bakery today and buy some kanelbullar - or bake their own. You'll find a good recipe for Swedish kanelbullar over on Sweden.se site (written by Anne).

I've previously given you recipe for my traditional cinnamon rolls (with step-by-step photos), as well as the hugely popular cinnamon pull-apart bread. Today's recipe is for Finnish korvapuustit ('Slapped ears') - more or less the same thing, just shaped and braided slightly differently.

Korvapuustit/Finnish cinnamon buns
(Soomlaste kaneelisaiad)
Makes about 16 large buns

Korvapuustit / Finnish cinnamon rolls / Soome kaneelisaiad

450 g all-purpose flour (about 750 ml or 3 cups)
85 g caster sugar (100 ml)
1.5 tsp ground cardamom pods
0.5 tsp salt
1 packet of fast-action dried yeast (about 11 g)
250 ml lukewarm milk (1 cup)
1 egg (divided)
75 g butter, softened

Filling:
50 g butter, softened
4 Tbsp caster sugar
cinnamon

Topping:
pearl sugar (optional)

In a large mixing bowl, mix most of the flour, sugar, cardamom, salt and yeast. Stir in the milk and about half of the egg (leave some for brushing the buns before baking). Knead in the softened butter and the rest of the flour, if necessary. Knead until you've got a soft and pliable dough that releases from the sides of the bowl. Cover with clingfilm or a clean towel and leave to prove for about 45-60 minutes, until doubled in size. (The place for proving should be warm and draught-free).
Turn the dough onto a lightly floured table, knead gently couple of times. Roll into a reclangle sized 30x60 cm. Spread soft butter over the dough, then sprinkle generously with cinnamon and sugar. Roll up tightly, starting from the long side, leaving the "seam" under the roll.

Now use a sharp knife to cut into buns, following the scheme here. The buns should be about 2 cm wide on the narrow end and 5 cm on the wide end.

Korvapuustit / Finnish cinnamon rolls / Soome kaneelisaiad

Transfer onto a parchment-lined baking sheet, placing them upright. Using your thumbs or a large pencil, press a dent into the middle of each bun, just like this:

Korvapuustit / Finnish cinnamon rolls / Soome kaneelisaiad

Cover with a kitchen towel and leave to raise for another 30 minutes in a warm place. Meanwhile, preheat the oven to 225 C/450 F.

Brush with egg wash and sprinkle with pearl sugar. Bake in a preheated oven for 10-15 minutes, until the buns and golden brown.

Take the baking sheet out of the oven, and cover the buns with a kitchen towel and let them cool (a little) - this way they remain nice and soft.

Korvapuustit / Finnish cinnamon rolls / Soome kaneelisaiad

Monday, September 28, 2015

Pesto Toast

Pin ItThis is one of my favorite lunches folks! It's just so hearty, fresh and filling, but doesn't make you feel gross after eating it. My kind of meal! And really, you can make it your own. Add whatever toppings sound good at the time. I've even done a pizza twist to it and added pizza sauce instead of pesto with peppers, onions and pepperoni as toppings. I have to give a big shout-out to my sister in law, Jen, for steering me toward this gem. I don't know what I would do without it in my life:)

1 slice of bread (I use Dave's Killer Bread)
2t pesto (or as much as you want!)
Handful of Spinach
Fresh Garden Tomato (OK store bought is good too)
Diced grilled chicken
Sprinkle of Mozzarella Cheese
Dash of Italian Seasoning

Place your oven setting on high broil. Put bread on a cookie sheet. Spread on pesto and then layer your toppings in whatever order you want. I layer this way: spinach, tomato, chicken, mozzarella, Italian seasoning. It's best if the cheese is on top so that it gets nice and bubbly and brown. Broil in the oven for a few minutes. I usually just keep an eye on it until it looks perfectly bubbly. Remove and sit and enjoy your healthy, filling lunch!

Saturday, September 12, 2015

Salsa Verde Honey Lime Chicken and Rice Bake


DSC_0757
How about that title? Haha!! It’s a mouthful. Just like this casserole. Oh. My. Gosh. This is to DIE for!! It made a whole bunch and we were just fine with that because we ate it for lunch and dinner for almost a week. I love how the sweetness of the honey shines through while still being a savory dish. 

Honey and lime together…a match made in heaven.
DSC_0759

I’ve been on a mission to find dinners I can make ahead and bake later or ones that are portable. You’ll probably see a lot of those from me in the next several weeks:) Soccer is in full swing and I’m trying to figure out how dinner works into that schedule. This casserole is a total homerun and a definite keeper!

1 pound chicken breasts, cooked and chopped
1 1/2 cups long grain rice or brown rice, cooked (measured uncooked)
1 16 oz. bottle salsa verde
1/2 cup sour cream
1 1/2 cups shredded Monterrey Jack cheese
1 1/2 cups sharp cheddar cheese
1 15 oz. sweet corn, rinsed and drained, or you can use frozen
1 4 oz. can green chilies

10 Minute Marinade
1/3 cup honey
1/2 cup lime juice
2 teaspoons chili powder
1 teaspoon onion powder
1 teaspoon garlic powder
1/2 teaspoon salt
1/2 teaspoon paprika
1/2 teaspoon cumin
dash - 1/2 teaspoon chipotle powder
dash - 1/4 teaspoon cayenne pepper (optional for more heat)

Preheat oven to 350 degrees.

In a very large bowl, whisk together the 10 Minute Marinade ingredients. Add cooked chopped chicken and let marinate at least 10 minutes.

Mix cheeses together and add 2 cups cheese, salsa verde, rice, sour cream, green chilies, and corn to the chicken and marinade. Stir until evenly combined. It will seem a little “wet” which is normal.

Add chicken/rice mixture to a 9 x 13 casserole dish and top with remaining cheese.

Bake for 30 minutes or until hot in the center then broil until cheese is golden.

Serve with desired garnishes. Enjoy!!

*From Carlsbad Cravings

Friday, August 21, 2015

Cinnamon Bun Popcorn


DSC_6539
This popcorn has been a staple in our house this summer. There’s something about a crunchy, portable popcorn that makes me feel like it’s a must for all summer activities. Ha!
This popcorn is SO addicting. Plan on having a lot of people around when you make it or you might just eat it all yourself.
DSC_6409
This recipe is from one of my most favorite sites, Our Best Bites. You know it’s good if they’ve made itSmile. It’s also great to package up in clear bags and give as gifts. So versatile and delicious! 

12 cups air popped popcorn (about 1/2 cup kernels)
1 cup roughly chopped pecans (these can easily be omitted)
1 cup brown sugar
3/4t cinnamon
1/4 cup Karo syrup
1 stick (1/2 cup) butter
1/2t baking soda
1t vanilla
3 squares almond bark

Preheat oven to 250 degrees. Place popcorn and chopped pecans in a very large bowl. I usually need to use 2 bowls to make less of a mess when mixing.

Combine brown sugar and cinnamon in a big, microwave safe bowl. Make sure you mix these two ingredients before adding anything else, otherwise it won’t turn out. Also, use a bowl larger than you think you’ll need because the ingredients will bubble up.

Chop butter into chinks and place on top of sugar mixture. Pour corn syrup over the top of everything. Microwave on high for 30 seconds and then stir to combine. Return to the microwave and heat for 2 minutes. Remove, stir and microwave for another 2 minutes.
Remove from the microwave and add vanilla and baking soda. Mixture will foam up a little. When combined, pour over popcorn and pecans and stir until it’s evenly coated. Spread popcorn mixture onto a foil-lines jelly roll pan. Place in the oven and bake for 30 minutes, stirring every 10 minutes.

After 30 minutes, take a piece out and let it cool. Sample it. If it’s not crunchy enough, bake for another 5 minutes. When it’s done, give it a final stir and dump in onto clean parchment paper. Using a fork, drizzle the melted almond bark over the popcorn. Don’t use white chocolate chips for this because it melts in your hands too easily. Almond bark or any sort of melting chocolate works best so it stays on the popcorn without getting all over your hands.

When it has all cooked, break it into chunks and enjoy!

*From Our Best Bites

Wednesday, August 12, 2015

Blueberry Muffins


DSC_1005
DSC_1002
I’ve been on the hunt for the best blueberry muffin recipe. This one is SO GOOD! And I love how it makes 24 muffins instead of 12 because come on, 12 really isn’t enough, right? Perfect for delicious summer breakfasts.

Preheat oven to 350 degrees. Place paper liners in muffin pans.

 Streusel Topping
1/2 cup all-purpose flour
1/2 cup sugar

4 tablespoons butter, slightly softened and cut into 1/2 inch pieces
In a medium bowl, stir flour and sugar.  Add butter pieces and combine mixture with a fork until topping resembles coarse crumbs.  Set aside.

Muffin Batter
2-1/2 cups all purpose flour
2 teaspoon baking powder
1/2 teaspoon baking soda
1-1/2 sticks butter
1-1/2 cups sugar
3 large eggs
1-1/2 teaspoon vanilla
8 ounces sour cream
1/4 cup milk
2-1/2 cups fresh blueberries

In a medium bowl, sift flour, baking powder and baking soda.
With an electric mixer fitted with a paddle attachment, cream the butter and sugar until light and fluffy (about 5 minutes). 

At low speed, beat  in one egg at a time, then add vanilla, sour cream, and milk until combined. 
Add 1/3 of dry ingredients at a time and beat until just combined. 
With a spatula, evenly fold blueberries into batter.
Spoon batter into muffin pans and fill each cup to the top.
Sprinkle streusel topping over batter.
Bake for about 24 minutes until a toothpick comes out clean and they are lightly brown.

Makes 24 muffins.

*From Little Magnolia Kitchen

Friday, July 17, 2015

Sautéed garlic scapes with tomatoes

Sautéed Garlic Scapes

Are you familiar with garlic scapes? I've actually mentioned them here on my blog, Nami-Nami, just over ten years ago (YES, NAMI-NAMI BLOG QUIETLY CELEBRATED ITS 10 BLOG ANNIVERSARY IN MID-JUNE) -  when I was still living in Edinburgh. I used to go to the fabulous Edinburgh Farmers Market every weekend, and it's there that I first encountered those spindly scapes, at the stall of Really Garlicky Company (I'm thrilled to see that they're still going strong, those Scottish garlic heroes). I threw those curly garlic tops into stir-fries back then, or chopped them and added to mash.

I grow some hardneck garlic in our beautiful garden these days as well, tucked between our strawberry plants to keep nasty bugs away. Sometimes - but only sometimes - I remember to snip the curly-spindly scapes off in the spring or early summer. This time I did, and made this lovely sauté with tomatoes and cheese. I found a recipe by William Woys Weaver over at Mother Earth News that sounded lovely. Mr Weaver topped his sautéed garlic scapes with cubed and fried halloumi cheese. Although the Cypriot halloumi-cheese is widely available in Estonia, I had none at home. However, as Mr Weaver mentioned that he got an idea for the dish in Slovenia - where local kajmak cheese* is way more popular than halloumi - and kajmak is similar to feta and bryndza cheese. Luckily I had bought some fresh bryndza cheese as well as Georgian suluguni cheese at the market on a previous day, so I used a mixture of these two instead.

A verdict - lovely and tasty and such a genius way for using up those spindly-curly scapes. One of my 5 aunties and one of my 13 cousins came over for dinner that night and the dish got their approval as well. At least none of us will ever waste any garlic scapes again :)

* A huge thanks to my friend Mann for helping me with the Slovenian cheese terms.

(Hautatud küüslauguvõrsed)
Serves 4

Sautéed Garlic Scapes

2 Tbsp extra virgin olive oil
2 Tbsp dark brown sugar
250 g garlic scapes
400 g fresh or canned chopped tomatoes
180 ml (about 3/4 cups) dry white wine
sea salt and freshly ground black pepper
1 Tbsp chopped fresh flat-leaf parsley
about 100 g of cheese (crumbled brynza or feta or cubed and fried halloumi)

Trim the garlic scapes by snipping off the thin tip on top of the garlic buds - this would simply burn on your pan. Discard. Cut the rest of the scapes into 5 cm/2 inch pieces.

Heat oil on a heavy frying pan over medium heat. Add sugar, then stir for a couple of minutes to melt and caramelise the sugar. Add the garlic scapes, cover and fry on a moderately high heat for about 3 minutes, shaking the pan every now and then.

Uncover, then add the tomatoes and wine. Cover the pan again, reduce heat and simmer on a low heat for 8-10 minutes, until the garlic scapes have al dente or softened, depending on your preference.

Season to taste, fold in the parsley and scatter with cheese. Serve hot or at room temperature.

Monday, June 1, 2015

Easy Brownie Cookies


DSC_5663
Sometimes you just need a fast, easy dessert. Of course, if you have the time, you should definitely make my original brownie cookies (recipe found here.) But sometimes I just want to open a box because that requires no brain power, which I’m really lacking right nowSmile

But if you’re going to open a brownie box, PLEASE make it be this one. These are the best box brownies. They also sell them in a 6 pack at CostcoWinking smile
DSC_5662
These are so fudgy, just like a brownie cookie should be.

1 box brownie mix
1 cup flour
3 eggs
1/3 cup oil
1/2 cup powdered sugar (for rolling cookies in)

Preheat oven to 350 degrees. Mix together brownie mix, flour, eggs and oil. The batter will be very thick. Pinch off a small amount of batter and roll it into a ball. roll ball in powdered sugar, being sure to cover completely. Set cookies 2 inches apart on an ungreased cookie sheet. Bake for 8-10 minutes and remove to a cooling rack. 

Tuesday, May 19, 2015

Badrijani nigvzit - Georgian aubergine rolls with walnut filling


Badrijani is the Georgian rolled eggplant dish we've been missing our whole life, wrote Lucky Peach on its Facebook page yesterday. I don't really know about rolled eggplant/rolled aubergine dishes in particular, but as far as eggplant dishes in general go, Georgian rolled aubergines are pretty wonderful. They're pictured on the top left corner above.

My recipe is pretty minimalist, as far as the seasoning goes. I've served them as part of a bigger Georgian spread (see f. ex. here), where the famous Georgian spice blend khmeli-suneli was used in various dishes. That's why I like my badrijani nigvzit (badrijani = aubergine/eggplant, nigvzit = walnuts) seasoned just with herbs, onion and vinegar. But feel free to use garlic instead of onion and to add some ground coriander or cumin seeds - or a generous spoonful of khmeli-suneli - to the walnut mixture to make it more flavoursome. Even chilli powder could be added, if you're fond of spicy dishes.

This great appetizer is low-carb, LCHF (low carb, high fat), gluten-free, vegan, Paleo etc. For more Georgian recipes, see my Georgian Flickr album or browse my Georgian recipes here.

Badrijani nigvzit aka Georgian eggplant rolls with walnut paste
(Pähklitäidisega pommurullid e. badrižani)

Serves 6 as an appetizer

2 slender eggplants/aubergines
sea salt
olive oil

Walnut filling:
250 g walnuts
2 onions
fresh dill, cilantro/coriander and parsley, chopped
3-4 Tbsp red wine vinegar
sea salt and freshly ground black pepper

To garnish:
pomegranate seeds

Cut the aubergines into long thin slices, lengthwise. Sprinkle with salt and let stand in a colander for 20-30 minutes. Drain the liquid, pat the slices dry with kitchen paper.

You can cook the aubergine either by frying or by baking. To fry them, heat some oil on a frying pan and fry on moderate heat until golden on both sides. To bake them, place into a 220C/450F oven and bake for about 20 minutes,  turning once.

To make the walnut filling, spread the walnuts on a baking sheet and roast at 180C/350F for about 10 minutes, until they're aromatic and golden. Remove from the oven and let cool.

If you dislike the taste of raw onion, fry the chopped onion in olive oil until translucent.

Place all the filling ingredients into the food processor and blend until coarse and combined. Transfer into a bowl and season to taste - the filling has to be just a wee bit vinegary.

Place a spoonful of the filling onto one end of the aubergine slice, then roll into a cigar (alternatively, spread a thin layer of the walnut paste over the whole length of the aubergine, then roll up).  Place onto a serving tray, and do the same with rest of the aubergine slices and the filling. Garnish with pomegranate seeds and fresh herbs.

More aubergine/eggplant recipes on Nami-Nami:
Grilled aubergine with feta, golden raisins and mint
Armenian aubergine stew
Ottolenghi's roasted aubergine with saffron yoghurt
Nasu dengaku (miso-glazed aubergine)
Aubergine curry with tomatoes, coriander and Nigella seeds
Sautéed aubergine (Melanzane al funghetto)
Israeli roasted aubergine and feta spread
Moussaka, deconstructed

More badrijani recipes on food blogs:
Karen @ Rambling Spoon
Gill @ Gill Stannard
kahviaddikti (recipe in Finnish)
Christina Nichol @ Lucky Peach

Wednesday, April 15, 2015

Homemade Breadtwists


DSC_5667
I LOVE bread. Pretty much in any form. And when I have people over, I have to make some sort of bread to go with dinner. These remind me of Pizza Factory breadsticks. They are SO soft and SO delicious! It’s also an awesome recipe because they are fast. There isn’t a lot of rising time. You can also use this dough as a pizza crust. Just use half of the dough for a pizza and the other half for a batch of breadsticks. One batch made 2 full cookie sheets of breadsticks. 

1½ cups warm water
2 T sugar
1 T yeast
3½ cups flour
1 tsp Salt
3 T butter 
Grated Parmesan Cheese
Garlic Salt

Mix warm water, sugar and yeast together.  Let that sit for 5 minutes.  Add flour and salt to the water, sugar, and yeast.  Mix this until smooth and let it raise for 10 minutes.  I used my Kitchenaid mixer with the dough hook.

Roll out the dough in a large square on a floured surface.  Brush the dough with the melted butter and sprinkle with parmesan cheese and garlic salt. Fold the dough in half.  Cut the dough into one inch strips with a pizza cutter. Twist the one inch strips of dough and place on a cookie sheet.  Let that sit for another 10-15 minutes to raise.

Bake at 400 degrees for 20 minutes or until golden brown.  My oven took about 17 minutes for these to be lightly brown.

Immediately after baking brush with more garlic butter and sprinkle with garlic salt and grated parmesan cheese.  Serve with marinara sauce, alfredo sauce, or ranch.

*From The Recipe Critic

Friday, April 3, 2015

Easter Treats

Peeps Rice Krispy Squares
DSC_6120
These are such a fun way to celebrate Easter! We made them for Camryn’s class and they all went crazy. And they aren’t hard to make! Such a fun, colorful way to make Easter a little bit more fun for the kids. You can find the recipe here. I just added melted white chocolate to the top with Easter sprinkles. Cute as an Easter button ;)
DSC_6121
No Bake Egg Nests
DSC_6122
We made these for Bryce’s class. I LOVE a no bake cookie and then by adding my FAVORITE Easter candy, Cadbury Mini Eggs, these have turned out to be the best! All you need to do is follow my recipe for No Bake Cookies, found here, and plop some Mini Eggs on top. Easy peasy.
DSC_6123
Happy Easter!!

Saturday, March 21, 2015

A recipe for gluten-free hazelnut meringue roulade aka Budapestrulle (Budapestbakelse)

ROOTSI: Budapestrulle. Budapest hazelnut meringue roulade.

I am writing this post while sitting on a really comfortable bed in a brand new hotel in Helsinki, called Indigo Hotel. I'm in town for a long weekend to enjoy the Streat Helsinki street food festival. The press trip is organised and hosted by Visit Helsinki, and we have been taken very good care of. This morning Heather of Heather's Helsinki took us for a coffee and Budapest cake at Karl Fazer Café at Kluuvikatu 3. The cake in question was a Budapest slice.

It's a popular cake from Sweden, attributed to a pastry chef Ingvar Strid who was born in 1926 in Vetlanda. It's a hazelnut meringue roulade filled with whipped cream and peeled clementine slices. Delicious! The version popularised by Fazer in Finland is slightly different - the clementines/mandarine oranges are replaced with bananas and raspberries. Different - and sweeter - but still nice.

Here's my version of Budapestrulle - I make the classic Swedish version. The recipe below uses a popular and widely available Swedish product, Marsán snabb vaniljsås, but feel free to replace it with cornflour or potato starch or even all-purpose flour (in latter case it won't be gluten-free, of course).

Since 2013, May 1st has officially been the Budapestbakelsensdag in Sweden.

Budapest slice
(Besee-pähklirull)

Serves 8 to 10

Meringue:
4 large egg whites
100 g caster sugar
150 ml (about 90 g) vanilla custard powder
100 g toasted hazelnuts, finely chopped

Filling:
200 ml whipping cream
1 tsp caster sugar
300 g canned mandarine oranges/clementines, drained

Decoration:
50 g dark chocolate
some canned mangarine oranges/clementines

Heat the oven to 200 C. Grease and line a shallow Swiss roulade tin/baking tray with a parchment paper.

Using electric mizer, whisk the egg whites until stiff but not try. Add the sugar in 2-3 installments, continue whisking until the mix is shiny and white.

Combine the hazelnuts and vanilla custard powder, then gently fold into the meringue mixture. Spread the mixture into the prepared tin. Bake in the middle of pre-heated oven for 12-15 minutes, until the meringue is risen and slightly golden on edges.

Take out of the oven and cool completely. Then turn over onto a new piece of parchment paper and peel off the "baked" parchment paper.

For the filling, whisk the cream and sugar until thick and fluffy, then spread over the meringue. Put some mandarine slices aside for decoration, then scatter the rest over the cream. Roll up the roulade, starting with the long end, and using the paper underneath to help. Carefully lift onto a serving dish, leaving the "seam" underneath.

Melt the chocolate, drizzle over the meringue roulade. Garnish with mandarine orange slices. To serve, cut the cake into thick slices.

The photo above is by Juta Kübarsepp, taken for my cookbook "Nami-Nami. Maailma maitsed 1" (Varrak, 2013).

Monday, March 16, 2015

Enchilada Pasta Casserole


DSC_3194 - Copy
I love a dinner that can be confined to a casserole dish. That way I can make it in the morning, stick it in the fridge, and then all I have to do is put it in the oven and dinner is ready! I love enchiladas and pasta, so combining them can only make a delicious combo! Mommy and kid approvedSmile

1 lb ground beef (ground turkey can be substituted)
1/2t chili powder
1/4t cumin
1/4t cayenne pepper
5oz cream cheese
1/4 cup sour cream (Greek yogurt can be substituted)
1 (10oz) can red enchilada sauce
1 cup shredded sharp cheddar cheese, divided
1 cup shredded monterey jack cheese, divided
1 cup corn kernels
1 (4oz) can diced green chilies
12oz egg noodles

Preheat oven to 350 degrees. Cook egg noodles according to package directions. In the meantime, in a large skillet, brown ground beef and drain the fat. Add chili powder, cumin and cayenne pepper. Stir to combine. Add cream cheese and stir until melted. 

In a large bowl, combine sour cream, enchilada sauce, half of the cheeses, corn kernels and green chilies. Pour over beef mixture, stir, and let simmer for 2-3 minutes. 

Drain pasta and add it to the beef mixture, making sure everything is coated in sauce. In a large casserole dish or 9x13 pan, pour in pasta mixture and top with remaining cheese. Bake for 20 minutes until cheese is completely melted and bubbly. Enjoy!

Monday, March 9, 2015

Macaroni Grill Rosemary Bread


DSC_5740
Have you ever been to Macaroni Grill? The bread they serve there is beyond amazing!! It's the perfect appetizer for hearty Italian meal. When I need a quick bread for dinner, I turn to this beauty. It’s easy to make for bread because it only rises once. It’s SOOOO GOOOOOD!!! Sometimes I just get a craving for it and absolutely have to make it. I’ve made it over a dozen times now and it’s turned out perfect every single time. The dough is so easy to whip up, then let it rise, then put it on the cookie sheet to bake. Yep, that easy.
DSC_5737
Mmmmm…crisp on the outside and warm and fluffy on the inside. Then you just tear it and dip it in olive oil and balsamic vinegar. My ABSOLUTE favorite!!!
DSC_5743
1 tbsp dry yeast
1 tbsp sugar
1 cup warm water
2 1/2 -3 cups all-purpose flour
1 tsp salt
2 tbsp fresh chopped rosemary or 2 tsp dry rosemary
1 tbsp oil, olive oil or canola
nonstick cooking spray
2 tbsp butter, melted
coarse salt

Combine yeast, sugar and warm water in a large mixing bowl. Allow to sit for 5-10 minutes or until frothy. Mix in salt 1/2 of the rosemary and 2 1/4 cups flour (it’s best with a mixer fitted with a dough hook)

Mix/ knead until dough is smooth and elastic about 8-10 minutes by hand or 3-5 minutes in a mixer…you may need to add more flour. In a large glass or plastic bowl, place oil and use your hand or a paper towel to coat the inside of the bowl with the oil. Place the dough in the oiled bowl, cover and place in warm area. Allow to rise until doublesd. Approx 30-40 minutes.

Preheat oven to 450 degrees. Spray baking sheet with cooking spray (or bake on parchment paper or Silpat liners), shape dough into two small round loaves and place each one on the cooking sheet 4-5 inches apart. Use fingers to push down and leave small wells where the butter can gather.
Using a pastry brush, brush butter evenly over the two loaves. Sprinkle each loaf with remaining rosemary and about 1/4 of coarse salt per loaf.

Bake for 12-15 minutes or until golden brown. Serve warm with dipping sauce (recipe to follow) you can slice it or just rip off pieces.

Dipping Sauce:
Combine equal parts balsamic vinegar and olive oil, add some fresh cracked pepper and coarse salt if desired.

*Adapted from The Mother Huddle